


Installing on the Floor or Shelf
This section explains examples of installing BRAVIA Theatre Sub 7 and BRAVIA Theatre Rear 8.
How to install
The following installation diagram is an example.
Example of installation in combination with the sound bar
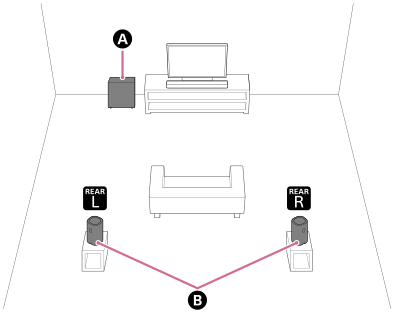
 BRAVIA Theatre Sub 7
 BRAVIA Theatre Rear 8
Example of installation in combination with the home theater system
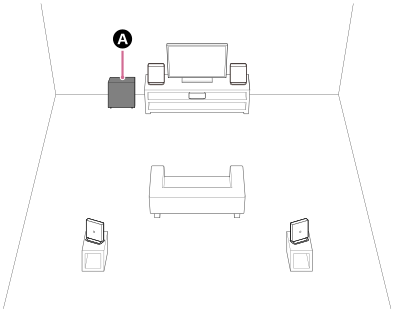
BRAVIA Theatre Sub 7
Example of installation with multi channel AV receiver/multi channel AV amplifier
Installation example for a 5.1 channel speaker system.
When used with a 5.1 channel speaker system, the front and center speakers are required in addition to BRAVIA Theatre Sub 7 and BRAVIA Theatre Rear 8.
Refer to the Help Guide of the multi channel AV receiver/multi channel AV amplifier for information on speaker placement according to speaker system configuration.
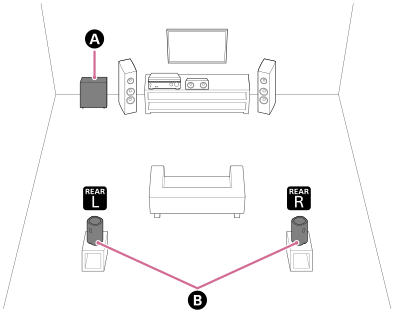
BRAVIA Theatre Sub 7
BRAVIA Theatre Rear 8
Installing BRAVIA Theatre Sub 7
The sound output from the subwoofer is omni-directional, so the subwoofer can be positioned as desired.
- The subwoofer outputs sound from the cloth-covered side and the side with holes. Do not block the side that emits sound.
- Do not place the subwoofer lying down.
Installing BRAVIA Theatre Rear 8
Install two rear speakers in combination as a pair on compatible models.
- Place the rear speakers backward toward the viewing position.
- It is recommended that the height of the rear speakers be placed in line with the height of the ear.
-
Check the labels on the bottom of the rear speakers to identify the right and left speakers.
The right speaker is labeled “REAR R” and the left speaker is labeled “REAR L.”
There are two tactile dots that are about 2 mm (3/32 in) in size on the dented bottom of the left speaker. Use them as a guide to distinguish the left speaker.
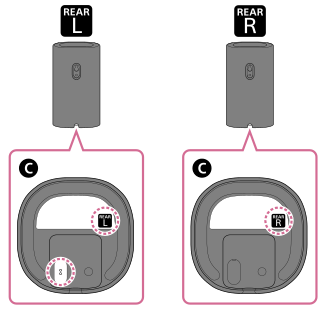
 Bottom of the speaker
- Place the left speaker in the left rear facing the front and the right speaker in the right rear facing the front.