Pairing and connecting with a computer (Windows 8.1)
The operation to register the device that you wish to connect to is called “pairing”. First, pair a device to use it with the headset for the first time.
Before you start the pairing operation, make sure that:
- Your computer has a Bluetooth function that supports music playback connections (A2DP).
- The computer is placed within 1 m (3 feet) of the headset.
- The headset is charged sufficiently.
- The operating instructions of the computer is in hand.
- Depending on the computer you are using, the built-in Bluetooth adaptor may need to be turned on. If you do not know how to turn on the Bluetooth adaptor or are unsure if your computer has a built-in Bluetooth adaptor, refer to the operating instructions supplied with the computer.
-
Enter pairing mode on this headset.
Turn on the headset when you pair the headset with a device for the first time after you bought it or after you initialized the headset (the headset has no pairing information). The headset enters pairing mode automatically.
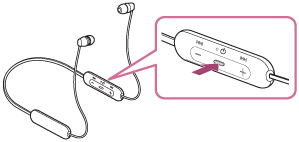
When you pair a second or subsequent device (the headset has pairing information for other devices), press and hold the
 button for about 7 seconds.
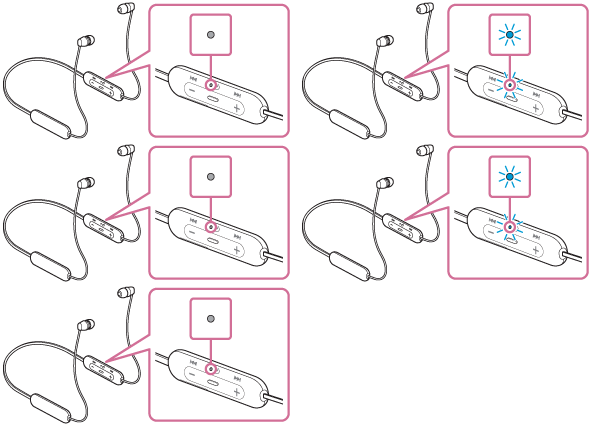
Check that the indicator (blue) repeatedly flashes twice in a row. You will hear a voice guidance “Bluetooth pairing”.
-
Wake the computer up from sleep mode.
-
Register the headset using the computer.
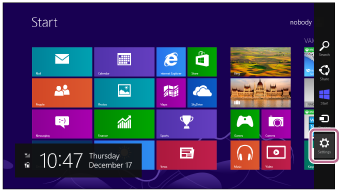
- Move the mouse pointer to the top-right corner of the screen (when using a touch panel, swipe from the right edge of the screen), then select [Settings] from the Charm Bar.
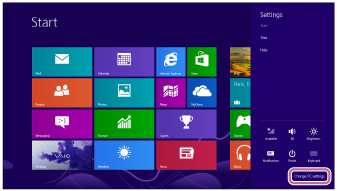
- Select [Change PC Settings] of the [Settings] charm.
- Select [PC and devices] of [PC Settings].
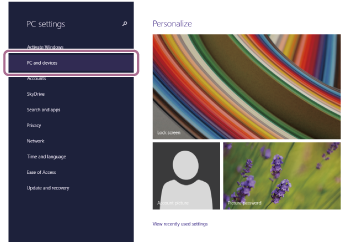
- Select [Bluetooth].
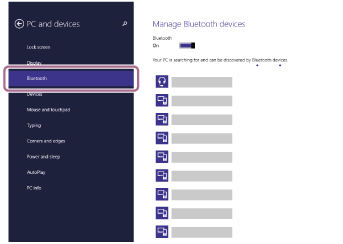
-
Select [WI-C200] or [WI-C310], then click [Pair].
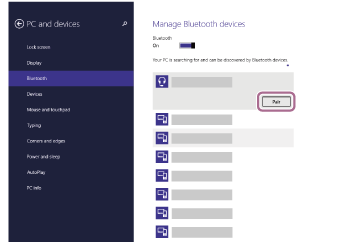
If Passkey (*) input is required, input “0000”.
The headset and computer are paired and connected with each other. You will hear a voice guidance “Bluetooth connected”.
If they are not connected, see “Connecting to a paired computer (Windows 8.1)”.
If [WI-C200] or [WI-C310] does not appear on the display, try again from step 3.
*A Passkey may be called “Passcode”, “PIN code”, or “Password”.
- Move the mouse pointer to the top-right corner of the screen (when using a touch panel, swipe from the right edge of the screen), then select [Settings] from the Charm Bar.
Hint
- The above procedure is an example. For more details, refer to the operating instructions supplied with the computer.
- To delete all Bluetooth pairing information, see “Initializing the headset to restore factory settings”.
Note
- If pairing is not established within 5 minutes, pairing mode is canceled, and the headset turns off. In this case, start the operation over from step 1.
- Once Bluetooth devices are paired, there is no need to pair them again, except in the following cases:
- Pairing information has been deleted after repair, etc.
- When a 9th device is paired.
The headset can be paired with up to 8 devices. If a new device is paired after 8 devices are already paired, the registration information of the paired device with the oldest connection date is overwritten with the information for the new device. - When the pairing information for the headset has been deleted from the Bluetooth device.
- When the headset is initialized.
All of the pairing information is deleted. In this case, delete the pairing information for the headset from the device and then pair them again.
- The headset can be paired with multiple devices, but can only play music from 1 paired device at a time.

