Screen Configuration
Main window
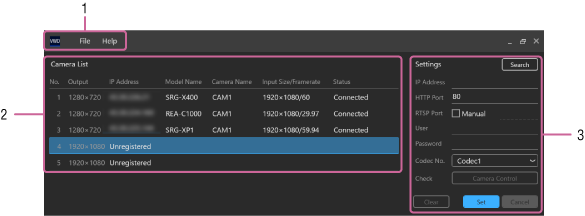
1. Menu bar
-
[File]
- [Exit]: Exit this software.
- [Delete All Settings]: Delete the configuration file saved by the software.
-
[Help]
- [Help]: Open the Help for the software in a web browser.
- [About]: Display the version information.
2. [Camera List]
Displays the information about the cameras registered in the software. Select and double-click a camera to open the setup screen of the camera in a web browser. You can also right-click a camera and select [Delete] to delete a registered camera.
- [Output]: Displays the output image size. The size is set to 1280x720 (fixed) for No. 1 to No. 3, and to 1920x1080 (fixed) for No. 4 and No. 5.
- [IP Address]: Displays the IP address that was configured when the camera was registered. If an address is not set, “Unregistered” is displayed.
- [Model Name]: Displays the model name acquired from the camera. If the IP address is not set or the model name cannot be acquired from the camera, this field is blank.
- [Camera Name]: Displays the camera name acquired from the camera. You can open the setup menu of the camera in a web browser and change the setting. If the IP address is not set or the camera name cannot be acquired from the camera, this field is blank.
- [Input Size/Framerate]: Displays the image size and frame rate acquired from the camera. If the IP address is not set, this field is blank.
-
[Status]: Displays the camera connection status. If the IP address is not set, this field is blank.
For details, see “Status List.”
3. [Settings]
This is used to configure cameras registered in the software. Each item displays the settings for the camera in the selected row in [Camera List].
- [Search] button: Opens the [Search] window.
- [IP Address]: Enter the IP address for the camera you want to register. When a camera is selected in the [Search] window, the IP address of the selected camera is entered automatically.
- [HTTP Port]: Enter the HTTP port number used to connect to the camera.
-
[RTSP Port]: Enter the RTSP port number used to connect to the camera.
If you place a check mark in [Manual], enter the RTSP port number in the entry field.
If you do not place a check mark in [Manual], the RTSP server port number acquired from the camera is displayed in the entry field. - [User]: Enter a user name (from among the user names registered in the camera beforehand) for use with this software.
- [Password]: Enter the password for the camera user name entered in [User].
- [Codec No.]: Select a codec number. If “Codec1” is selected for an SRG-XB25/XP1 camera, it will automatically be changed to “Codec2” upon registration. If “Codec3” is selected for an REA-C1000 camera, it will automatically be changed to “Codec1” upon registration.
- [Check]: Pressing the [Camera Control] button will display the setup screen of the camera in a web browser. This is only enabled if the camera IP address is set. You can also select and double-click the camera in [Camera List] to display the setup screen of the camera in a web browser.
- [Clear] button: Resets all items in the [Settings] area to default values. If you want to delete a registered camera, first clear all settings to default values and then press the [Set] button and confirm. You can also select and right-click a camera in [Camera List] and select [Delete] to delete the camera.
- [Set] button: Registers the settings configured in the [Settings] area for the camera.
- [Cancel] button: Cancels the changes made in the [Settings] area and returns to the current values.
[Search] window
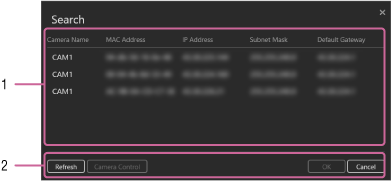
1. Search results display area
Detects cameras supported by this software using the network camera IP Setup Protocol and displays the information for each camera.
Click [Camera Name] to sort the list display in ascending or descending order.
Double-click a displayed camera to copy the camera IP address to the [Settings] area of the main window and close the [Search] window.
2. Button area
- [Refresh] button: Conducts a camera search again and updates the details in the search results display area.
- [Camera Control] button: Displays the setup screen of the camera selected in the search results display area in a web browser.
- [OK] button: Copies the IP address of the camera selected in the search results display area to the [Settings] area of the main window, and closes [Search] window.
- [Cancel] button: Closes the [Search] window.