Wi-Fi Settings: Access Point Set.
You can register your access point manually. Before starting the procedure, check the SSID name of the access point, security system, and password. The password may be preset in some devices. For details, see the access point operating instructions, or consult the access point administrator.
-
MENU →
 (Network) → [Wi-Fi Settings] → [Access Point Set.].
 -
Select the access point you want to register.
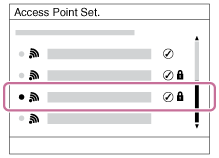
When the desired access point is displayed on the screen: Select the desired access point.
When the desired access point is not displayed on the screen: Select [Manual Setting] and set the access point.*
- If you select [Manual Registration], input the SSID name of the access point, then select the security system.
The default security method is [WPA2]. - If you select [WPS PIN], you can register the access point by entering the PIN code displayed on the camera into the connected device.
* If the camera’s system software (firmware) is Ver.2.01 or later, wireless connections using WEP or WPA are not supported.
- If you select [Manual Registration], input the SSID name of the access point, then select the security system.
-
Input the password, and select [OK].

- Access points without the
 (lock) mark do not require a password.
- Access points without the
-
Select [OK].
Other setting items
Depending on the status or the setting method of your access point, you may want to set more items.
- Priority Connection:
- Select [On] or [Off].
- IP Address Setting:
- Select [Auto] or [Manual].
- IP Address:
- If you are entering the IP address manually, enter the set address.
- Subnet Mask/Default Gateway/Primary DNS Server/Second DNS Server:
- If you have set [IP Address Setting] to [Manual], enter each address according to your network environment.
Note
-
When manually setting an access point or IP address, the number and types of characters that can be entered are as follows.
- SSID : The maximum length is 32 characters. The types of characters that can be entered are letters of the alphabet (both uppercase and lowercase), numbers, and symbols.
- Password : The length must be between 8 and 64 characters. The types of characters that can be entered are letters of the alphabet (both uppercase and lowercase), numbers, and symbols.
- IP Address / Subnet Mask / Default Gateway / Primary DNS Server / Second DNS Server: The maximum length is 15 characters. The types of characters that can be entered are numbers and “.” only.
- To give the registered access point priority in the future, set [Priority Connection] to [On].