Video Pro Streaming mode
Video Pro supports live streaming using RTMP.
- While using Video Pro, tap
 (Settings icon) > [Streaming mode] > [On].When you turn on the function for the first time, various notes or information will appear. Confirm the messages, mark the checkboxes, and then tap [OK] to proceed to the following steps.
 - In the Settings menu, tap [Connect to], and then select the method of RTMP streaming.
- [RTMP URL]: Select to stream using RTMP. In the Settings menu, set [RTMP stream URL] and [RTMP stream key].
- [YouTube™]: Select to stream using YouTube. Follow the on-screen instructions to set [YouTube™ account] and [YouTube™ live event]. To create a new event, tap [Create new event].
Hint
- You can share the YouTube live URL. Tap (Settings icon) > [Live event URL] >
 (Share icon), and then follow the on-screen instructions. When you create a new event, (Share icon) appears in the creation results dialog for the YouTube live event.
- Close the Settings menu.
- Tap
 (Streaming button) to start streaming.
You can switch between the front and main camera and change lenses during streaming.
To stop streaming, tap
 (Streaming button).
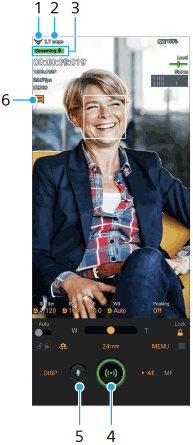
Video Pro Streaming mode screen overview
Vertical style
Horizontal style

- Network status
- Streaming bitrate
- Streaming status/Microphone status
- Tap to start or stop streaming.
- Tap to mute or unmute the microphone.
- Tap to open or close the YouTube live chat window.
Note
- When using Video Pro, observe the terms of service for the live streaming service and requirements related to live streaming.
- Depending on the live streaming service, the conditions or specifications may change or be added without notice.
- If live streaming does not work properly, try switching the network type. To switch the network type, find and tap [Settings] > [Network & internet] > [SIMs], select a SIM, tap [Preferred network type], and then select a network type. Available network types depend on your contract.
Hint
- You can create a shortcut for the streaming mode on the Home screen. Touch and hold
 (Video Pro icon). From the menu that opens, drag [Streaming mode] to the desired location.
 - You can set whether to automatically switch to the recording mode or to the last selected mode when you launch Video Pro. To change the setting, tap (Settings icon) > [Mode at launch].
- To select the network for streaming, tap (Settings icon) > [Network usage].
- To make streaming more stable, adjust the video settings according to the specifications of the live streaming service, the network bandwidth, and the network status. Tap [Menu] > [Video format] or [FPS] and tap (Settings icon) > [Video quality] to select an option for each setting. The options are as follows.
Video format FPS Video quality (streaming bitrate) Low Medium High 1920x1080P 29.97 3 Mbps 4.5 Mbps 6 Mbps 25 2.5 Mbps 3.75 Mbps 5 Mbps 1280x720P 29.97 1.5 Mbps 2.75 Mbps 4 Mbps 25 1.25 Mbps 2.3 Mbps 3.4 Mbps -
Disturbances or discontinuation of video images and audio may occur at low communication speeds, such as when streaming in a place where the signal quality is poor or while moving. In this case, the following settings may improve the video and audio conditions.
- Tap [Menu] > [Video format], and then select [1280x720P].
- Tap (Settings icon) > [Video quality], and then select [Low].
TP1001596622