[H.323/SIP]
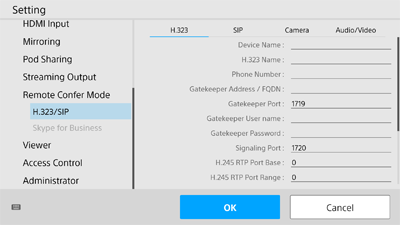
There are four tabs on the [H.323/SIP] page.
Note
- A Remote Communication License must be purchased and activated to conduct video conferencing using H.323/SIP.
[H.323] tab
Use this tab to configure settings relating to H.323.
[Device Name]
Enter the device name.
[H.323 Name]
Enter the H.323 name to register with the gatekeeper.
[Phone Number]
Enter the E.164 number to register with the gatekeeper.
[Gatekeeper Address / FQDN]
Enter the IP address or FQDN of the gatekeeper.
[Gatekeeper Port]
Enter the port number of the gatekeeper.
[Gatekeeper User name]
Enter the user name for logging in to the gatekeeper.
[Gatekeeper Password]
Enter the password for logging in to the gatekeeper.
[Signaling Port]
Enter the port number used for signaling.
[H.245 RTP Port Base]
Enter the fixed RTP port number.
[H.245 RTP Port Range]
Enter the RTP port number range.
[Enable Gatekeeper Multicast Discovery]
Place a check mark here to enable gatekeeper auto discovery.
[H.323 RAS Multicast Address]
Enter the multicast address used by RAS.
[H.323 RAS Multicast Port]
Enter the multicast port number used by RAS.
[Enable NAT Traversal]
Place a check mark here to enable NAT traversal.
[Add H.245 Address To Connect]
Place a check mark here to add the H.245 address to those allowed to be connected.
[SIP] tab
Use this tab to configure settings relating to SIP.
[Display Name]
Set the name displayed to the remote party for an outgoing call.
[SIP ID]
Enter the SIP user name.
[Phone Number]
Enter the telephone number for SIP.
[Transport Type]
Select the transport type used by SIP.
[Registrar Address]
Enter the address of the SIP registrar.
[Registrar Port]
Enter the port number used when communicating with the SIP registrar.
[Registrar Username]
Enter the user name to register with the SIP registrar.
[Registrar Password]
Enter the password to register with the SIP registrar.
[Outbound Proxy Address]
Enter the address of the outbound proxy.
[Outbound Proxy Port]
Enter the port number used when communicating with the outbound proxy.
[Signaling Port]
Enter the port number used for signaling.
[STUN Standard]
Select the standard used by the STUN protocol.
[STUN Server Address]
Enter the address of the STUN server.
[STUN Server Port]
Enter the port number used when communicating with the STUN server.
[STUN Server User name]
Enter the user name to register with the STUN server.
[STUN Server Password]
Enter the password to register with the STUN server.
[Use Secret Binary for STUN]
Place a check mark here to use secret binary for the STUN user name and password.
[Check Subnet]
Place a check mark here to check the subnet.
[Camera] tab
Use this tab to configure settings relating to cameras. Configure settings using the remote control for the camera or other means while viewing the displayed camera image.
Note
- Settings cannot be configured if not connected to the camera.
[Audio/Video] tab
Use this tab to configure settings relating to video and audio for video conferencing.
Note
- The resolution and frame rate of the transmitted video are adjusted automatically according to the display content, performance of the connected device, and actual line conditions.
The relationship between network throughput and resolution/frame rate is shown below.- Throughput vs. Resolution and frame rate
- Less than 256 kbps: CIF @ less than 30 fps
- 256 kbps or higher: CIF @ 30 fps
- 384 kbps or higher: VGA @ 30 fps
- 704 kbps or higher: SVGA @ 30 fps
- 768 kbps or higher: 720p @ 30 fps
[Max video frame rate]
Select the maximum value for the video frame rate.
[Max Video Bandwidth]
Select the maximum value for the bandwidth available for use during video conferencing.
The frame rate of the camera image and presentation screen, and [Audio Bandwidth] are automatically adjusted to fit within the set bandwidth.