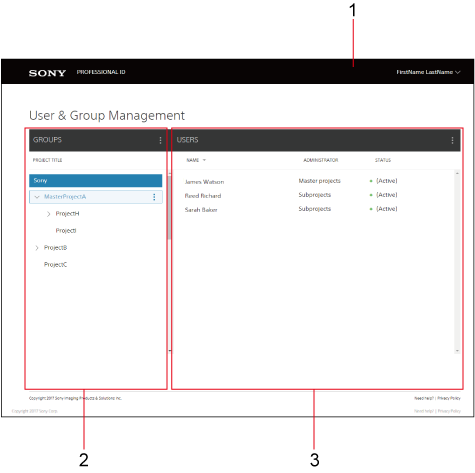
Screen Description
The Administrator screen is comprised of the following parts.
Note
- The authority for the operations described in this Help is granted by the Tenant Admin of the organization to which it belongs.
- Use in an operating environment that can display 1280 or more pixels horizontally. The screen may not be displayed correctly when displaying fewer than 1280 pixels in the horizontal direction.
1. User name
Clicking the user name displays the following menu items.
- Back: Return to the previous page.
- Sign out: Sign out from PROFESSIONAL ID service.
2. Project list
Displays a list of the registered projects.
Master projects, projects, and subprojects are displayed.
Clicking the  button in the title bar of the project list displays the project menu.
- Add master project: Create a new master project.
- Add project: Create a new project.
- Add subproject: Create a new subproject.
- Import CSV: Import user information from a CSV file.
- Export CSV: Export user information for the selected project to a CSV file.
Selecting a project and clicking the button on the right side displays the context menu.
- Add master project: Create a new master project.
- Add project: Create a new project.
- Add subproject: Create a new subproject.
- Edit project: Edit information for the selected project.
- Delete project: Delete the selected project.
3. User list
Displays the users, status, and role assigned to each user for the users registered in the project selected in the project list. If no project is selected in the project list, then it displays the users who do not belong to any project.
The following types of user status are displayed.
- PROVISIONED: Indicates that the user has been created.
- ACTIVE: Indicates that the user has set a password and secret answer.
- LOCKED_OUT: Indicates the user has exceeded the maximum number of login attempts due to an incorrect password.
Clicking the button in the title bar of the user list displays the user menu.
- Create new user: Create a new user.
- Add/Remove user(s) to/from project: Add users to the selected project or remove users from the selected project.
Selecting a user and clicking the button on the right side displays the context menu.
- Edit user: Edit information for the selected user.
- Remove user: Remove the selected user from the project.
- Delete user: Delete the selected user from the tenant.
- Reset Multifactor: Reset multifactor authentication for the selected user.