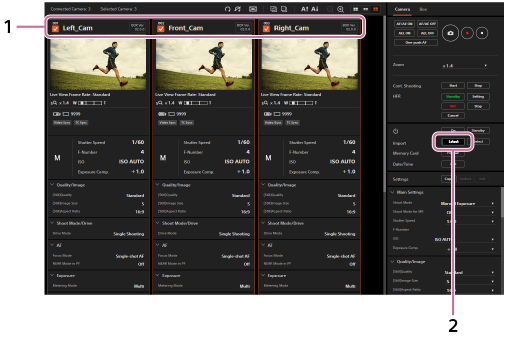
Control area
You can operate and configure the camera and the product.
The available functions differ depending on the model of the camera connected to the product.
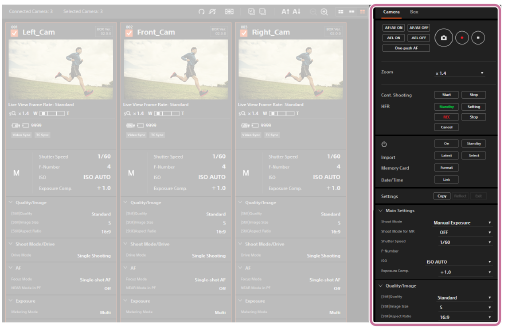
“Camera” tab
You can perform shooting operations and change the settings for selected cameras using the “Camera” tab.
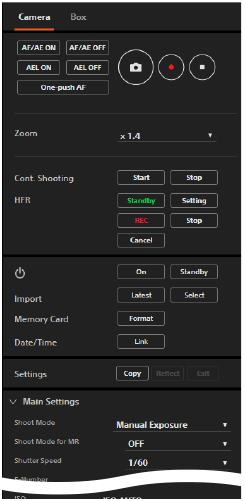
Shooting buttons
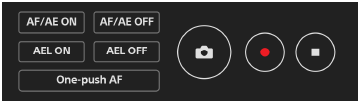
- AF/AE ON
- Performs auto-focusing and locks the exposure.
- During execution of “AF/AE ON,” the message “Executing AF/AE...” appears in the shooting information field (camera information area). You cannot change the settings for the camera while this message is displayed.
- AF/AE OFF
- Cancels auto-focusing and exposure locking.
- AEL ON
- Locks the exposure.
- AEL OFF
- Cancels exposure locking.
- One-push AF
- Focuses automatically in the manual focusing mode. You can adjust the focus of multiple cameras simultaneously, and then fine-tune the focus of each camera manually.
- The message “Executing One-push AF…” is displayed in the shooting information field (camera information area) while executing the One-push AF function.
- To exit the One-push AF function, click “One-push AF” again.

Shoots a still image.
- This button works only when the camera is set to the still-image shooting mode.
- Continuous shooting cannot be performed even if you press and hold this button. Use the “Cont. Shooting” buttons to perform continuous shooting.

Starts movie recording.
- This button works only when the camera is set to the movie recording mode.

Stops movie recording.
Zoom (Zoom scale)

- Select the desired zoom scale using the pull-down menu.
Cont. Shooting (Continuous shooting)

- These buttons work only when the camera is set to the still-image shooting mode and the drive mode is set to the continuous shooting mode.
- Start
- Starts continuous shooting.
- During continuous shooting, the message “Executing Cont. Shooting...” appears in the shooting information field (camera information area). You cannot change the settings for the camera while this message is displayed.
- Stop
- Stops continuous shooting.
HFR (High-Frame-Rate shooting)
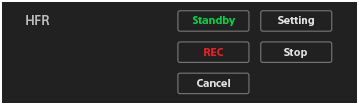
- These buttons work only when the camera is set to the HFR mode.
- Standby
- Switches the camera to the shooting standby screen.
- Setting
- Switches the camera to the shooting setting screen.
- REC
- Starts HFR shooting.
If the timing of recording is set to the start-trigger mode in the camera’s HFR shooting settings, capturing (shooting) will start.
If the timing of recording is set to the end-trigger mode or the end-trigger half mode, capturing will end and the camera will start recording the movie to the memory card. - Stop
- If the timing of recording is set to the start-trigger mode in the camera’s HFR shooting settings, the camera will stop any HFR shooting in progress.
- Cancel
- Cancels recording to the memory card.
 (Power)

- On
- Turns the cameras on.
- Standby
- Turns the cameras off.
Import (File transfer)

- Latest
- Imports the most recent files from all of the selected cameras to a computer.
-
Add a check mark to the desired cameras.
-
Click “Latest.”
The screen for file transfers will appear.
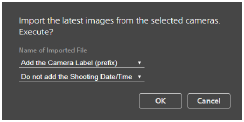
-
Set a file name for the imported files, and then click “OK.”
The most recent files from the selected cameras will be imported to the product, and then transferred to the computer.
-
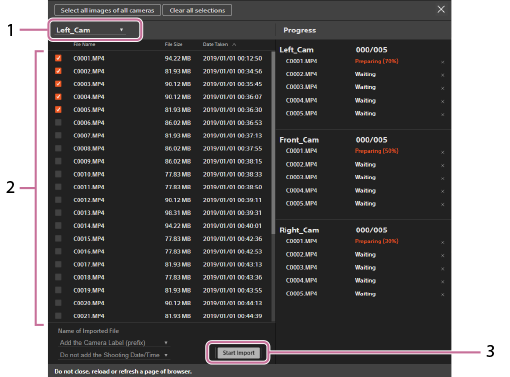
Select
Select the desired images to be transferred on the file import screen, and then transfer them to a computer.
-
Select the camera.
You can select a camera by its camera label using the pull-down menu at the top of the file import screen.
The images shot by the camera that corresponds to the selected camera label will be listed.
-
Select the desired images using the checkboxes on the file import screen.
Click “Select all images of all cameras” on the top of the screen to add a check mark to all the images, or click “Clear all selections” to remove all check marks.
-
Set a file name for the imported files, and then click the “Start Import” button.
The selected images will be imported to the computer.
- To close the file import screen, click
 in the top right of the screen. If is not displayed, change the display scale of your browser.
Hint
-
You can specify the file names for the imported files using the pull-down menu before transferring.
Adding the camera label
- Add the Camera Label (prefix):
- Imports files with the camera label prefixed to the original file names of the selected images.
- Do not add the Camera Label:
- Imports files without the camera label.
Adding the shooting date/time
- Do not add the Shooting Date/Time:
- Imports files without the shooting date/time.
- Add the Shooting Date/Time (prefix):
- Imports files with the shooting date/time prefixed to the original file names of the selected images.
- Add the Shooting Date/Time (suffix):
- Imports files with the shooting date/time suffixed to the original file names of the selected images.
-
When using the “Latest” function, if there are multiple recent files recorded on the same date and time on the camera’s memory card, the files will be selected as follows:
- If the images are recorded in the RAW&JPEG format, only the JPEG files will be selected.
- If multiple JPEG images were recorded using continuous shooting, only one of the images will be selected.
Note
- If the images on the memory card inserted into the camera do not transfer, check the security level settings of the computer.
- If you try to transfer images from a camera connected to a camera control box with the MASTER/CLIENT (Master/Client) switch set to CLIENT, a confirmation screen may not be displayed in the web browser after the data is prepared. In this case, downloads from a domain other than the one displayed may be restricted in the computer’s settings. Check the settings on the computer.
- You cannot transfer files with an individual size of 40 GB or larger.
- When using the “Latest” function, if a movie of 4 GB or more in size is recorded on the camera’s SDHC memory card, it will be divided and only the most recent file will be transferred.
Memory Card (Memory card)

Formats the memory card inserted into the camera.
Date/Time (Date and time setting)

You can apply the date, time, and area settings on the computer to the date, time, and area settings on the camera.
Settings (Copying and applying shooting settings)

- Copy
- Copies the shooting settings of the selected camera and displays them in the control area. Only one camera can be selected.
- Reflect
- Applies the shooting settings currently displayed in the control area to the selected cameras. Multiple cameras can be selected.
- Exit
- Exits the function for copying shooting settings.
Shooting settings
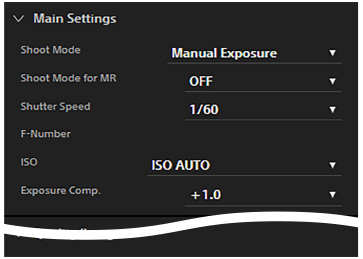
You can change the shooting settings for the cameras. Select the desired setting from the pull-down menu for each setting item.
- Click
 next to a setting title to collapse the items. Click
  next to a setting title to expand it.
“Box” tab
You can set the synchronization signal, update the software, or initialize all of the connected camera control boxes using the “Box” tab.
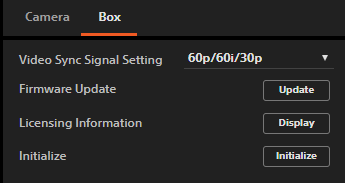
Video Sync Signal Setting (Settings for the video synchronization signal)

You can set the video synchronization signal for synchronizing the connected cameras. Select a frame rate according to the movie recording settings on the cameras.
- “Video Sync” appears in the shooting information field (camera information area) during exposure synchronization.
“TC Sync” appears in the shooting information field (camera information area) during time-code synchronization. - Select MENU →
 (Setup) → [TC/UB Settings] → [TC Run] → [Free Run] on each camera when you perform time-code synchronization.
 - If you add a camera control box to the network after the date has changed, the time code for the added camera control box will be desynchronized even if you have already performed time-code synchronization. In this case, restart the camera control box whose MASTER/CLIENT (Master/Client) switch is set to MASTER.
- If the selected synchronization signal is different from the recording setting on the camera, synchronization will not be performed.
- When you use the HDMI output function, set the frame rate in the HDMI output settings according to the recording settings on the camera.
- Set the recording setting for HFR shooting to 24p when you are using the cameras in the NTSC mode and want to synchronize them in the HFR shooting mode.
- You cannot perform time-code synchronization when the recording format is set to MP4, or in the HFR shooting mode.
Firmware Update (Software update)

You can update the software of the camera control box. All of the camera control boxes in the same network can be updated at once.
- Download the update file from the designated website in advance.
- Do not disconnect the cables or shut down the power source while updating. This may cause the product to malfunction.
- The message “Update Warning” indicates that the software (firmware) of the camera control box is already up to date. You do not need to update it.
- For the latest information on software updates, refer to the product website.
Licensing Information (Licensing information)

You can view the licensing information for the software included in the product.
Initialize (Initialization)

You can initialize the settings, etc. for the camera control boxes.
- Do not shut down the power source during initialization. This may cause the products to malfunction.