Location and function of parts
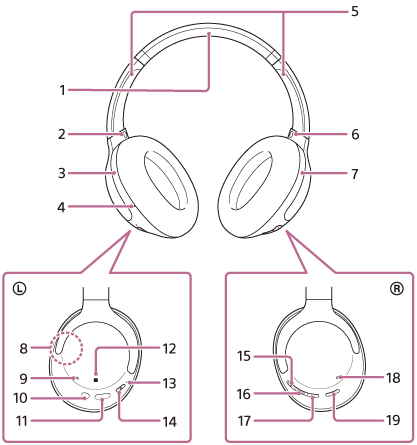
- Headband
-
 (left) mark
 - Left unit
- Tactile dot
There is a tactile dot on the left unit. - Sliders (left, right)
Slide to adjust the length of the headband. -
 (right) mark
 - Right unit
- Built-in antenna
A Bluetooth antenna is built into the headset. - Microphone (left)
Picks up the sound of your voice (when talking on the phone) and noise (when using the noise canceling function). - Headphone cable input jack
Connect a music player, etc. using the supplied headphone cable. Make sure that you insert the cable until it clicks. If the plug is not connected correctly, you may not hear the sound properly. - USB Type-C port
Connect the headset to an AC outlet via a commercially available USB AC adaptor or to a computer with the supplied USB Type-C cable to charge the headset. - N-Mark
- Indicator (blue/red)
Lights up in red while charging.
Lights up in red or blue to indicate the power or communication status of the headset. -
 (power) button
 -
+ (volume +) button
There is a tactile dot on the + button. Use this dot as a guide when operating the headset. -
 (play/call/next/previous) button
Operate to play music, make a call, skip to the beginning of the next track, skip to the beginning of the previous track (or the current track during playback), etc. - – (volume –) button
- Microphone (right)
Pick up the sound of the noise when the noise canceling function is in use. - NC/AMB (noise canceling/Ambient Sound Mode) button