Location and function of parts
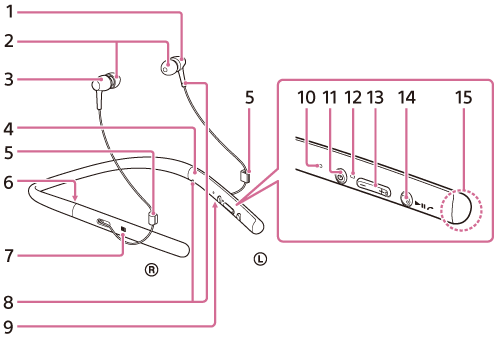
-
 left unit
 - Earbuds
-
 right unit
 - L mark
- Magnet clip
You can bundle the cables with the clip when you do not use the headset. - R mark
- N-mark
- Tactile dot
The left unit has a tactile dot. - Micro-USB port
Connect a computer to this port with the supplied micro-USB cable to charge the headset.
You can connect a playback device to this port with the supplied dedicated headphone cable. - Indicator (blue/red)
Lights up in red during charging.
Lights up in red or blue to indicate the power or communication status of the headset. -
 (power) button
 - Microphone
Picks up the sound of your voice when talking on the phone. - +/- buttons
The + button has a tactile dot. Use this dot as a guide when you operate the headset. - Multi-function button
 /
/ button
Controls various call and playback functions.
This button has a tactile dot. Use this dot as a guide when you operate the headset. - Built-in antenna
A BLUETOOTH antenna is built into the headset.