[Network]
Note
- In the Windows desktop version Pod application, the settings of the operating system are applied, and this page is not displayed.
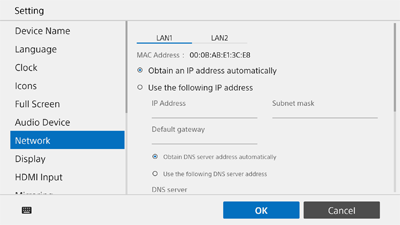
The [Network] page has two tabs ([Ethernet] and [Ethernet 2]) for configuring network settings of the LAN 1 and LAN 2 connectors on the rear panel.
Note
- The use of the LAN 1 connector only is recommended.
If the LAN 2 connector is used at the same time, the protocol used by Vision Exchange must be transmitted and received by the correct NIC. To use LAN1 and LAN2 together, the network administrator must set the appropriate routing in the Windows settings. Failing to do so may cause unexpected trouble, such as problems with mirroring images.
[Obtain an IP address automatically]
Select this if obtaining an IP address automatically (DHCP).
[Use the following IP address]
Select this if using a fixed IP address, and configure the following settings.
Enter settings for [IP Address], [Subnet mask], and [Default gateway], and select either [Obtain DNS server address automatically] or [Use the following DNS server address] for the DNS server.
If [Use the following DNS server address] is selected, enter a setting in [DNS server].
[Proxy Setting]
To use a proxy server, place a check mark in [Use a proxy server], and configure the following settings.
Enter proxy server information in [Address], [Exceptions], [User], and [Password]. Place a check mark in [Bypass proxy server for local address] as required.
To use the Pod sharing function, enter the IP address of the main unit or Pod to connect to when Pod sharing in [Exceptions].
Hint
- To specify multiple IP addresses in [Exceptions], use an asterisk (for example, “192.168.10.*”) or enter the IP addresses separated by semi-colons (;).