Connecting the neckband speaker with a computer via a BLUETOOTH® connection (Windows)
The process to register the information of a target device required for BLUETOOTH connection is called pairing.
To use a device in combination with the neckband speaker via a BLUETOOTH connection, it is necessary to pair the neckband speaker with devices on an individual basis.
Supported operation systems
Windows 10, Windows 8.1
Before proceeding, make sure of the following:
-
Bring the neckband speaker within a distance of 1 m (3.2 ft) from your computer.
-
Charge the built-in battery sufficiently.
-
Bring the operating instructions supplied with your computer at hand for reference.
-
To avoid any sudden loud sound output from the neckband speaker, turn down the volume of both the computer and the neckband speaker or stop music playback.
-
Set the speaker of your computer to on.
If the speaker of your computer is set to
 (mute), sound does not output on the neckband speaker.
-
When the speaker of your computer is set to on:

-
- Put the neckband speaker into pairing mode.
When you pair the neckband speaker with a BLUETOOTH device for the first time after purchase or after you initialize the neckband speaker (and all the pairing information is deleted from the neckband speaker), turning on the neckband speaker automatically puts it into pairing mode. In such a case, proceed to step
 .
.To pair the neckband speaker with a second or subsequent BLUETOOTH device (of which pairing information the neckband speaker has), make sure that the neckband speaker is turned off, and then press and hold the
 (power)/
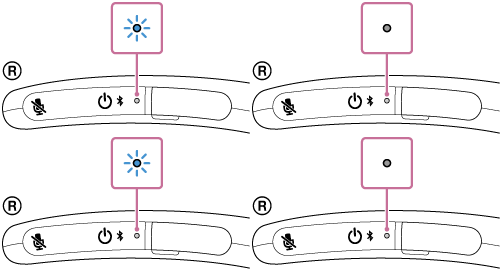
 (BLUETOOTH) button for about 5 seconds until you hear voice guidance (BLUETOOTH pairing). When the neckband speaker is in pairing mode, the indicator starts double flashing in blue.
Note
-
Be sure to keep holding the button even in the event that you hear voice guidance (Power ON) in about 2 seconds after you press and hold
 (power)/
 (BLUETOOTH) button.
-
- Register the neckband speaker to the computer.
For Windows 10
-
Click the [Start] button, then [Settings].
-
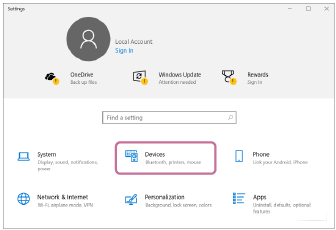
Click [Devices].
-
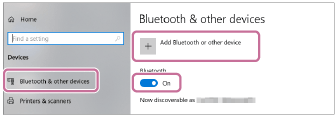
Click the [Bluetooth & other devices] tab, click the [Bluetooth] switch to turn on the BLUETOOTH function, and then click [Add Bluetooth or other device].
-
Click [Bluetooth].

-
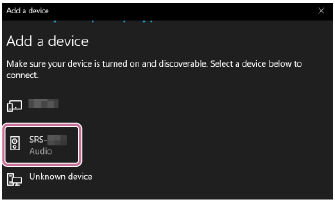
Select [SRS-NB10].
If [SRS-NB10] does not appear, perform the operation again from step
 .
. -
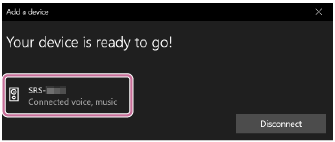
After pairing, the BLUETOOTH connection establishes automatically and [Connected music] or [Connected voice, music] will be displayed on the screen. Proceed to step
 .
.
For Windows 8.1
-
Right-click on [Start], and then click [Control Panel].
When [All Control Panel Items] is displayed, select [Devices and Printers].
If the [Control Panel] screen appears instead of [All Control Panel Items], select [Large icons] or [Small icons] from the [View by] menu in the top right corner of the screen.
-
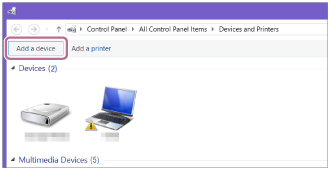
Click [Add a device].
-
Select [SRS-NB10] and click [Next].
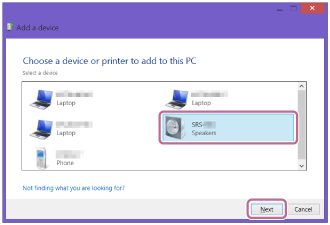
If [SRS-NB10] does not appear, perform the operation again from step
 .
. -
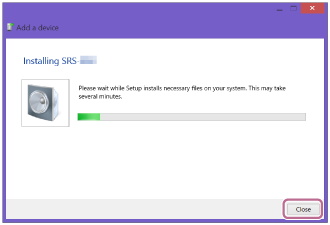
When the following screen appears, click [Close].
The computer begins installing the driver.
The “
 ” mark will appear in the bottom left of the [SRS-NB10] icon during installation. When the “
 ” mark disappears, driver installation is complete. Proceed to step
 -5.
-5.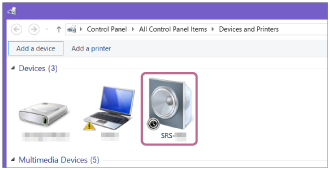
Depending on the computer, installation may take time. If driver installation takes too much time, the Automatic Power Off function of the neckband speaker will cause it to turn off automatically. If this happens, turn on the neckband speaker again.
-
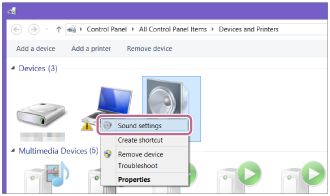
Right-click on [SRS-NB10] in [Devices] and select [Sound settings] from the menu that appears.
-
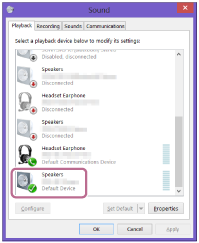
Confirm [SRS-NB10 Stereo] on the [Sound] screen.
-
If there is a checkmark (green) on [SRS-NB10 Stereo], proceed to step
 .
.
-
If there is not a checkmark (green) on [SRS-NB10 Stereo], proceed to step
 -7.
-7. -
If [SRS-NB10 Stereo] does not appear, right-click on the [Sound] screen, and select [Show Disabled Devices] from the menu that appears. Then proceed to step
 -7.
-7.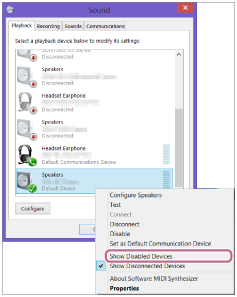
-
-
Right-click on [SRS-NB10 Stereo], and select [Connect] from the menu that appears.
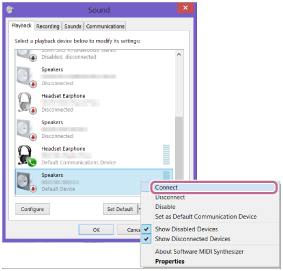
When the neckband speaker is connected, a checkmark will appear on [SRS-NB10 Stereo] on the [Sound] screen. Proceed to step
 .
. 
If you cannot click [Connect] for [SRS-NB10 Stereo], select [Disable] for the [Default Device] that currently has a checkmark (green).
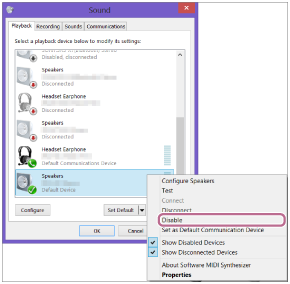
-
- Follow the on-screen instructions to establish a BLUETOOTH connection.
When a BLUETOOTH connection is established, you hear voice guidance (BLUETOOTH connected) from the neckband speaker and the indicator on the neckband speaker starts flashing in blue.
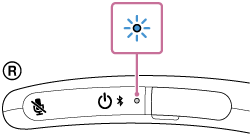
If a BLUETOOTH connection is not established, repeat the procedure all over again from step
 .
.
Hint
-
The above instructions are provided as an example. For details, refer to the operating instructions supplied with your computer. In addition, not all the computers are tested and found compatible with the above procedure and the procedure is not applicable to home-built computers.
-
When [SRS-NB10] and [LE_SRS-NB10] are displayed for the connection attempt, select [SRS-NB10].
Although [LE_SRS-NB10] is first displayed, wait until [SRS-NB10] is displayed.
It may take about 30 seconds to 1 minute before [SRS-NB10] is displayed.
If [SRS-NB10] is not displayed, repeat the procedure all over again from step
 .
. -
If passkey entry is prompted on a computer with Windows 10 or Windows 8.1, enter “0000.”
The passkey may be called a “passcode,” “PIN code,” “PIN number,” or “password.”
Note
-
The neckband speaker comes out of pairing mode in about 5 minutes and the indicator on the neckband speaker turns to slow blue flashing. However, when the neckband speaker has no pairing information, for example when you use the BLUETOOTH function of the neckband speaker for the first time after purchase, the neckband speaker remains in pairing mode. If the neckband speaker comes out of pairing mode before you complete the procedure, repeat the procedure all over again from step
 .
. -
Once the neckband speaker is paired with the BLUETOOTH device, there is no need to pair them again, except in the following cases:
-
Pairing information is deleted in the course of repair work, etc.
-
The neckband speaker is already paired with 8 devices and another device is to be paired.
The neckband speaker can be paired with up to 8 BLUETOOTH devices. When a new device is paired in addition to 8 paired devices, the pairing information of the earliest device connected via a BLUETOOTH connection is replaced by the information of the new one.
-
The pairing information of the neckband speaker has been deleted from the paired BLUETOOTH device.
-
The neckband speaker is initialized.
All the pairing information is deleted. Once the neckband speaker is initialized, it may fail to establish a BLUETOOTH connection with the computer. In such a case, delete the pairing information of the neckband speaker from the computer, and then pair the neckband speaker with the computer all over again.
-
-
The neckband speaker can be paired with multiple devices, but can only play music from one paired device at a time.

