Mounting the Bar Speaker on a Wall
Note
- Prepare screws (not supplied) that are suitable for the wall material and stability. Depending on the wall material, the wall may be damaged.
- Fasten the screws securely in the wall beam.
- Hang the bar speaker horizontally on the reinforced wall.
- Have the installation done by a Sony dealer or licensed contractor and pay special attention to safety during the installation.
- Sony shall not be held responsible for accidents or damage caused by improper installation, insufficient wall stability, improper screw installation, natural disasters, etc.
- Two or more persons are required to hang the bar speaker for safety.
-
Prepare two screws (not supplied) that are suitable for the wall mount holes on the rear of the bar speaker.
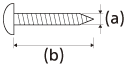
(a) 4 mm (3/16 in)
(b) More than 30 mm (1 3/16 in)
Hole on the rear of the bar speaker
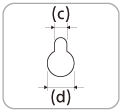
(c) 5.1 mm (7/32 in)
(d) 10 mm (13/32 in)
-
Align the vertical line above the “
 TV CENTER LINE” printed on the WALL MOUNT TEMPLATE (supplied) with the center of the width of your TV.
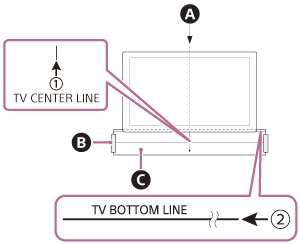
 Center of the TV
 Adhesive tape, etc.
 WALL MOUNT TEMPLATE
-
Align the “
 TV BOTTOM LINE” printed on the WALL MOUNT TEMPLATE with the bottom of your TV, then adhere the WALL MOUNT TEMPLATE on the wall with a commercially available adhesive tape, etc.
 - Fasten the screws prepared in step 1 securely into the screw marks on the “
 SCREW LINE” printed on the WALL MOUNT TEMPLATE.
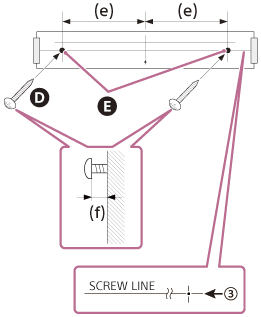
 Screws
 Marks
Marks
(e) 254 mm (10 in)
(f) 9.5 mm to 10.5 mm (approx. 13/32 in)
-
Remove the WALL MOUNT TEMPLATE.
-
Connect cables to the bar speaker.
- Connect the HDMI cable (supplied) to the HDMI OUT (TV (eARC/ARC)) jack on the bar speaker.
- Connect the AC adaptor (supplied) to the DC IN terminal on the bar speaker.
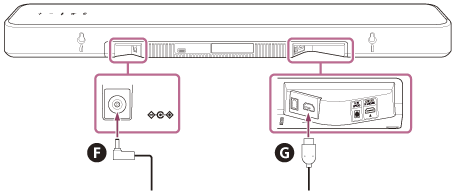
 AC adaptor (supplied)
 HDMI cable (supplied)
-
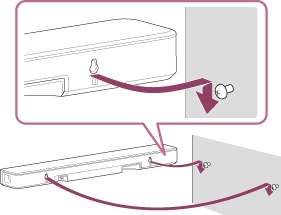
Hang the bar speaker on the screws.
Align the holes on the rear of the bar speaker with the screws, then hang the bar speaker on the two screws.
-
Connect the HDMI cable (supplied) connected to the bar speaker to the eARC/ARC HDMI input jack of the TV.
-
Connect the AC power cord (mains lead) of the AC adaptor (supplied) connected to the bar speaker to the AC outlet (mains).
Note
- If your TV is not compatible with eARC/ARC, connect an optical digital cable (not supplied) in addition to the HDMI cable (supplied).
- When adhering the WALL MOUNT TEMPLATE on the wall, smooth it out fully.
- Install the bar speaker apart from the TV by 70 mm (2 7/8 in) or more.
- Hang the bar speaker so that the bottom of the bar speaker is at least 3 cm (1 3/16 in) above the floor.
Mounting the optional speakers on a wall
Refer to the operating instructions of the optional speakers.