Changes after updating the software to Android 11
In addition to the update of the software to Android 11, some changes are also made to the existing functions. The following are some of the major changes after updating your device to Android 11.
This Help Guide does not describe all Android 11 features and functions. Some features, functions, settings, and elements of the screen design may differ from the content of this Help Guide after updating your device to Android 11.
Recording your device screen
- Drag the status bar downwards twice and tap
 (Screen Record icon) in the Quick settings panel.
If you cannot find
(Screen Record icon), swipe the Quick settings panel to the left.If you cannot find the icon in the Quick settings panel, tap
 (Edit icon), and then drag and drop (Screen Record icon) into the upper part of the screen.
 - Follow the on-screen instructions to start recording the screen.
To stop recording, drag the status bar downwards and tap the Screen recorder notification.
Note
- This Screen recorder and similar functions provided by other apps cannot be used at the same time as the [Screenshot] function or the [Record] function of the Game enhancer app.
New features of Photo Pro
Memory recall function
You can register often-used modes or settings in advance and recall them when taking photos.
Tap [MENU] > [Shooting] > [Camera settings memory], and then follow the on-screen instructions.
To use the Memory recall mode, select [MR] in the shooting mode, confirm the settings, and then tap [Set].
Aspect ratio setting
 (Aspect ratio icon) has been added in the Setting icons area on the standby screen.
New features of Cinema Pro
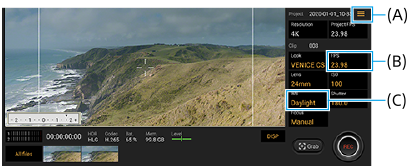
Assigning functions to the camera key or volume keys (A)
You can assign functions to the camera key or the volume keys.
Tap  (Menu icon) and select [Assign camera key] or [Assign volume keys].
Frame rate setting for the 4K images (B)
In addition to while the resolution is set to [2K], [120 (24)] can now be selected for FPS while the resolution is set to [4K].
Resetting the white balance (C)
You can reset the white-balance setting in the clip menus.
Swipe operations for viewing recorded video clips or still images
While playing a video clip or still image, swipe left or right to display the previous or next video clip or still image.
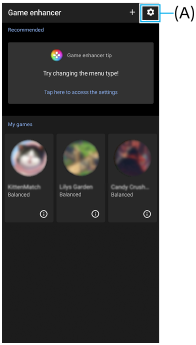
New features of Game enhancer
Storing game icons
You can store and manage all game apps together in My games. Game icons that you store on the Game enhancer app screen will be hidden from the Home screen and the app drawer.
To use this function, tap  (Settings icon) (A) and turn on the [Store game icons] switch.
Make sure that you have not changed the Home screen from [Xperia Home] and that  (Game enhancer icon) is located on the Home screen to turn on this function.
Optimize V.C. microphone
The [Optimize V.C. microphone] function has been added to the [Game mode] menu that appears while gaming.
This function improves the microphone sound quality when voice-chatting while using a headset with a built-in mic connected to the 3.5 mm audio jack of your device, such as a gaming headset.
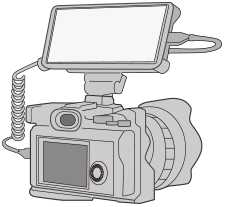
External monitor app
The External monitor app can help you in the following situations:
- Take advantage of the high-definition display of your Xperia by using it as a camera monitor or a sub-monitor.
- Ensure your subject is in focus by pinching in or out on the smartphone screen to zoom in or out.
- Find the best lighting in various shooting environments using the Brightness adjustment function.
-
Find and tap
 (External monitor icon) to launch the External monitor app.
If
(External monitor icon) is not in the app tray, find and tap [Settings] > [Device connection] > [Connection preferences], and then tap the [External monitor] switch. -
Connect a video device.
- Connect a video device that supports USB Video Class (UVC) output to your Xperia via a USB Type-C cable.
- Connect a video device that supports HDMI output to your Xperia using an HDMI cable together with an HDMI-UVC conversion adapter.
New features of Side sense
You can move the position of the Side sense bar more easily, and even place it anywhere you want on the screen.
This function can be used when the touch position is set to [Operate on inner edge of screen] in the Side sense settings menu.
-
To move the Side sense bar up and down, touch and hold the Side sense bar and drag it.
-
To place the touch position anywhere you want on the screen, touch and hold the Side sense bar, and then drag it toward the center of the screen. The shape of the Side sense bar changes to a circle.
Double-tap the circle to open the Side sense menu.
Slide your finger up on the circle to display the Multi-window menu and slide your finger down on it to return to the previous screen.
Drag the circle to the edge of the screen to change the circle back to the Side sense bar.

Hint
- To set [Operate on inner edge of screen], find and tap [Settings] > [Display] > [Advanced] > [Side sense] > [Configure touch position] > [Manual].
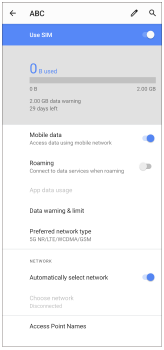
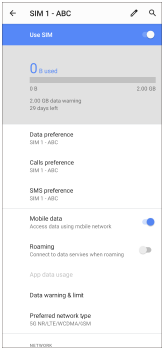
SIM card settings
The menu structures for SIM card settings and mobile network settings have changed.
SIM card setting screen
- When using one SIM card:
Find and tap [Settings] > [Network & internet] > [Mobile network] to set the SIM card.
- When using two SIM cards:
Find and tap [Settings] > [Network & internet], and then tap the name of the SIM card whose functions you want to set.
Hint
- If you set one SIM card for calling and the other SIM card for data communications, you may not be able to access the internet while talking on the phone. In this case, turn on the [Data during calls] switch of the SIM card for calling. You will now be able to perform data communications even during calls.
Setting the Dual SIM reachability function (when using two SIM cards only)
Launch the Phone app, and then tap  (More icon) > [Settings] > [Calling accounts] > [Dual SIM reachability].