BASIC (Basic) mode overview
 Photo mode
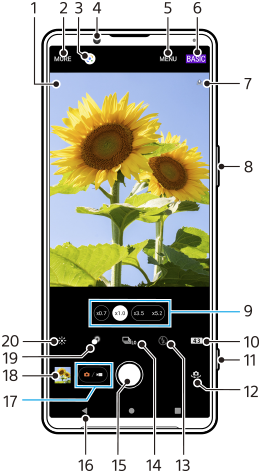
- Scene recognition icon and conditions icon
These icons appear when Photo Pro automatically recognizes a scene or condition. - Select a capturing mode
- Google Lens
- Front camera lens
- Photo Pro settings menu
- Switch the shooting mode
- Geotagging status
- Use the volume button to zoom in or out
- Tap one of the angle buttons to switch lenses
- Select an aspect ratio
- Use the shutter button to launch Photo Pro or take photos
- Switch between the front and main camera
- Select a flash setting. The icon color changes when the flash or flashlight activates.
- Drive mode button
Select a self-timer setting or a single shooting, continuous shooting, or HDR continuous shooting mode. - Use the shutter button to take photos
- Go back or exit Photo Pro
- Switch between taking photos and videos
- Tap the thumbnail to view, share, or edit photos
- Tap to adjust the Bokeh effect
- Tap to adjust color and brightness
 Video mode
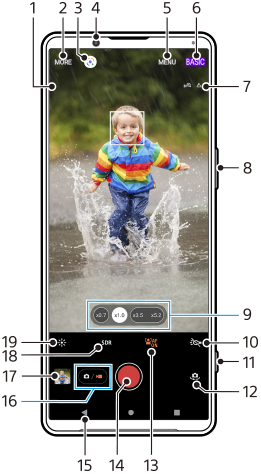
- Selected microphone
Nothing is displayed when using the device microphone. - Select a capturing mode
- Google Lens
- Front camera lens
- Photo Pro settings menu
- Switch the shooting mode
- Geotagging status
- Use the volume button to zoom in or out
- Tap one of the angle buttons to switch lenses
- Tap to activate the flashlight. The icon color changes when the flashlight is activated.
- Use the shutter button to launch Photo Pro or record videos
- Switch between the front and main camera
- Tap to enable the [Face/Eye AF] function
- Use the shutter button to record videos
- Go back or exit Photo Pro
- Switch between taking photos and videos
- Tap the thumbnail to view, share, or edit videos
- Tap to select HDR (High Dynamic Range) or SDR (Standard Dynamic Range).
- Tap to adjust color and brightness