Structure of the Settings Screen
The Settings screen is used to configure the Connection Control Manager, the transmitting camcorders, and receiving PWS-110RX1A units. You switch between pages using the tabs along the top of the screen.
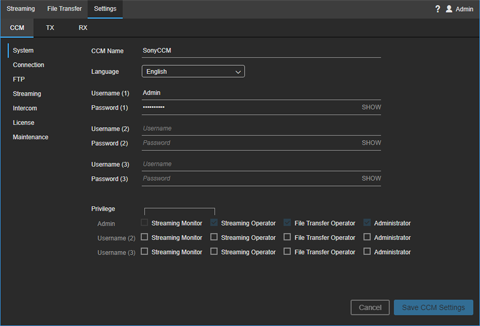
[CCM] tab
Configures Connection Control Manager settings.
[System]
- CCM Name: Enter the name of the Connection Control Manager.
- Language: Select the display language of the Connection Control Manager.
- Username (1): Enter the administrator user name to use when logging in to the Connection Control Manager.
- Password (1): Enter the password for the user name above. You can view the password by clicking [SHOW].
- Username (2) / Username (3): Enter the general user names to use when logging in to the Connection Control Manager. Two general users can be configured.
- Password (2) / Password (3): Enter the password for the user name above. You can view the password by clicking [SHOW].
-
Privilege : Set the privileges for each user. Place a check mark in the checkboxes to grant privileges.
- Streaming Monitor: Grants streaming monitor privileges to users.
- Streaming Operator: Grants streaming operator privileges to users.
- File Transfer Operator: Grants file transfer operator privileges to users.
- Administrator: Grants administrator privileges to users.
[Connection]
Configures settings for logging in to the Connection Control Manager from a transmitting/receiving device.
TX Connection
- Username (1) / Username (2): Enter the user names to use when logging in to the Connection Control Manager from a camcorder. Two users can be configured.
- Password (1) / Password (2): Enter the password for the user name above. You can view the password by clicking [SHOW].
- Port: TCP port number used when connecting to the Connection Control Manager from a camcorder.
If [TX Connection] items are changed, reconnect the camcorder after saving the settings.
XDCAM pocket Connection
- Username (XPT): Enter the user name to use when logging in to the Connection Control Manager from XDCAM pocket.
- Password (XPT): Enter the password for the user name above. You can view the password by clicking [SHOW].
- Port: TCP port number used when connecting to the Connection Control Manager from XDCAM pocket.
If [XDCAM pocket Connection] items are changed, reconnect XDCAM pocket after saving the settings.
Point to Point Connection
- Username: Enter the user name to use when logging in to the Connection Control Manager from a PWS-110RX1A that will transmit point-to-point streaming.
- Password: Enter the password for the user name above. You can view the password by clicking [SHOW].
- Port: TCP port number used when connecting to the Connection Control Manager from a PWS-110RX1A streaming transmitter.
If [Point to Point Connection] items are changed, run the Initialization Tool on the PWS-110RX1A after saving the settings, then reconnect.
RX Connection
- Username: Enter the user name to use when logging in to the Connection Control Manager from a PWS-110RX1A streaming receiver.
- Password: Enter the password for the user name above. You can view the password by clicking [SHOW].
- Port: TCP port number used when connecting to the Connection Control Manager from a PWS-110RX1A streaming receiver.
If [RX Connection] items are changed, run the Initialization Tool on the PWS-110RX1A after saving the settings, then reconnect.
[FTP]
Up to five FTP settings can be configured. Select the individual settings tabs and configure each item.
- Enable FTP Server Setting 1: Set to on to use an FTP server.
- FTP Server Name: Enter the FTP server name.
- FTP Server Address: Specify the IP address or FQDN (for example, ftp.example.com) of the FTP server.
- FTP Server Port: Enter the FTP server port. Specify “21” if using the FTP protocol.
- Passive Mode: Specify whether to use passive mode for connections to the FTP server. Check with the administrator of the FTP server.
- Use FTPS: Specify whether to connect using FTPS.
- FTPS Server CA Certificate (PEM): Displays the contents of the server CA certificate used for FTPS connections. Click the [Select] button, and select a .pem file. Configuration of this item is not required if not using FTPS connections.
- Check CN and CRL: Specify whether to perform common name (CN) and certificate revocation list (CRL) authentication when connecting via FTPS.
- FTP Username: Enter the user name for connection to the FTP server.
- FTP Password: Enter the user password for connection to the FTP server.
- Upload Directory: Enter the full path of the upload destination directory on the FTP server (for example, /home/sony). If a directory is not specified, the upload destination is the root folder.
- Create Sub Directory: Placing a check mark in the [Use Transmitter Name] checkbox will create a sub directory with the name of the transmitter as the upload destination directory for uploading files. If the checkbox is cleared and a directory is specified in [Upload Directory], files will be uploaded to the specified directory. If the checkbox is cleared and a directory is not specified in [Upload Directory], a sub directory is created with the date as the name in the root directory, and files will be uploaded to that directory.
- [Check] button: Check the entered FTP settings.
[Streaming]
- Use Target Bit Rate setting.: Specify whether to enable manual setting of the target bit rate in the Settings area of the Streaming screen. Placing a check mark in the checkbox enables you to select a [Target Bit Rate] value, depending on the [Network Range] setting in the Settings area.
- Use HEVC if available.: Place a check mark in the checkbox to use H.265/HEVC. A separate license is required to use this function. H.265/HEVC transmission is not performed if H.265/HEVC is not supported by the transmitter device or if H.265/HEVC is not enabled on the transmitter device.
[Intercom]
To use the intercom function, link the camcorder with the PWS-110RX1A on the receiver side under [Receiver Audio Ch.].
The audio channels must be registered beforehand using the Initialization Tool in order to use the intercom function. For details, see “Registering Receivers.”
[License]
Displays the license status of the transmitting device.
- [Add Licenses] button: Adds a new license.
- [Export CSV] button: Exports the license status as a CSV file.
[Dashboard]
Displays the streaming usage status.
- Streaming Time: Displays the cumulative streaming time in graph view.
- Streaming Performance: Displays the streaming history in graph view. You can click the graph area and zoom in/out using the mouse wheel. You can drag left/right to scroll the range of the graph.
[Maintenance]
- CCM Software Version: Displays the software version of the Connection Control Manager.
- CCM Software Settings: Press the [Backup] button to back up the configuration file. The backup file is output to the C:\CCM-Server\backup folder. For details about backing up and restoring, refer to the Software Update Guide.
[TX] tab
Configures the transmitting camcorder or the wireless adapter.
-
 (Add SRT Caller) button: Adds an SRT caller. Click the button to add one line to the TX settings. Enter a name and select a group. When finished, click the [Save TX Settings] button.
 - Name: Enter the name of the camcorder or wireless adapter to display in the Connection Control Manager.
- Group: Select the group to which the camcorder or wireless adapter belongs.
- Model Name: Displays the model name of the camcorder or wireless adapter.
- Serial No.: Displays the serial number of the camcorder or wireless adapter.
- Software Version: Displays the software version of the camcorder or wireless adapter.
- FTP Server Name: Select the FTP server setting (stipulated setting) from the drop-down list.
-
 (Delete) button: Deletes the camcorder or wireless adapter from the list.
 - [Edit Group] button: Edits groups.
[RX] tab
Configures the PWS-110RX1A receiver settings.
List
- Name: Displays the name to display in the Connection Control Manager.
- Model Information: Displays the model name and serial number.
- Software Version: Displays the software version of the streaming receiver.
- MSQ Information: Displays version information about the installed MSQ board (SDI input/output board).
-
(Delete) button: Deletes the PWS-110RX1A from the list.
Items
- Name: Enter the name to display in the Connection Control Manager.
- External Host Name: Enter the IP address or host name for accessing the PWS-110RX1A unit from the Internet.
- External Port Range: Enter the number of the first UDP port used for receiving streaming content from the Internet.
- SRT Listener Port (SDI 1,2): Displays the receive port number used when outputting to SDI 1/2 if receiving using SRT. Selected from the range of external ports.
- SRT Listener Port (SDI 3,4): Displays the receive port number used when outputting to SDI 3/4 if receiving using SRT. Selected from the range of external ports.
SDI Settings
- Resolution: Select the output picture resolution.
- Frame Rate: Select the output picture frame rate.
-
Reference Lock: Select the external sync signal used to lock the SDI output.
- Free Run: Does not lock to an external sync signal.
- SD Black Burst / Composite: Lock to the black burst signal.
- HD Tri-level Sync: Lock to a tri-level sync signal.
- Output: Displays the lock status of the SDI output with respect to an external sync signal.
- Output Signal: [Color Bar] or [User Image] can be specified as the output image when streaming is stopped. When [Black] is specified, a black screen image is output. If [User Image] is specified, specify an image file for display as the output image (1920×1080 resolution JPEG or BMP image) using the Initialization Tool.
- SDI (1,2) Port Name / SDI (3,4) Port Name: Used to rename the SDI 1/2 and SDI 3/4 ports.
SRT Listener Settings
Configures SRT receive settings. Match to the settings on the SRT caller side.
- Resolution: Displays the expected screen size of the input video. Displays the same resolution value as the SDI setting.
- Frame Rate: Displays the expected frame rate of the input video. Displays the same frame rate value as the SDI setting.
- Codec: Selects the codec of the input video.
- Latency (20 - 8000 ms): Sets the latency in the range 20 to 8000 milliseconds. You can set the latency separately on both the transmit side and receive side, but the larger of the two values will be used.
- Encryption: Enables/disables encryption and selects the encryption method. AES-128 corresponds to pbkeylen=16 and AES-256 corresponds to pbkeylen=32. When encryption is enabled, only streams that are encrypted with the same method can be received.
- Passphrase: Enter the passphrase used for encryption.
Output Option Settings
Selects options for output of the received stream.
- SDI Output Only: Output on SDI connector only.
- P2P Enabled: When the point-to-point function is enabled using the Initialization Tool, “P2P Enabled” is automatically selected and cannot be changed.
- File Output: Enable file output.
- RTMP Output: Enable RTMP output.
File Output (SDI 1,2 Only)
- Mode: Specify the method for saving video images during streaming to a file. When [Sync with Streaming] is selected, saving to file also starts when streaming starts, and stops when streaming stops. When [Sync with REC Flag] is selected, saving to file starts/stops in sync with the REC/STOP flag sent from the camcorder. When [Off] is selected, recording to file is not performed.
-
Destination: Specify the network path of the file save destination. Use only alphanumeric characters and symbols supported for Windows folder names in the file save destination (for example, “\\Server\Share” or “D:\”). Specify storage that can be accessed from Explorer as the save destination. The PWS-110RX1A system drive cannot be specified as a destination.
To save to network storage, connect network storage to the same network as the PWS-110RX1A. For details, refer to the manual for the network storage. - Auth Username: Enter the user name for authentication, if user account entry is required for accessing the specified file save destination.
- Auth Password: Enter the password specified for the user name above.
- Auto Delete: Specify whether to enable automatic deletion of saved files. To enable automatic deletion, select [On] and specify the number of days to keep files and the schedule for deletion.
RTMP Output (SDI 1,2 Only)
- Stream URL: Enter the URL of the RTMP output destination (for example, rtmp://rtmp.example.com:1935/live). For RTMPS output, specify “rtmps://” in the URL (for example, rtmps://rtmps.example.com:443/live).
- Stream Name / Key: Enter the stream name or key.
- RTMP Authentication: Place a check mark in the checkbox if authentication will be required.
- Username: If [RTMP Authentication] is enabled, enter a user name.
- Password: If [RTMP Authentication] is enabled, enter a password.
- Resolution: Select the RTMP output resolution.