Using the KVM switch (Auto switch function)
KVM stands for "Keyboard, Video, Mouse".
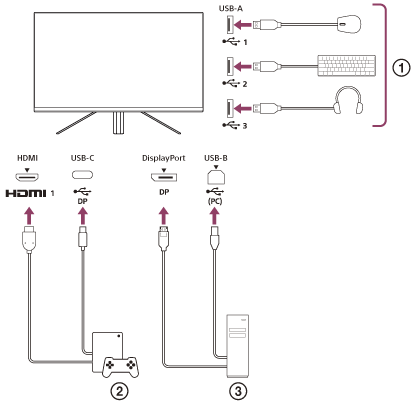
When 2 devices such as a computer or game console are connected to this monitor, you can select the USB device (such as a keyboard and mouse) that controls them all at once.

 Mouse, keyboard, headset, etc.
 Game console
 Computer
When the connection is made as shown in the diagram above, the USB device (
 ) that controls the game console (
 ) and computer (
 ) can be selected all at once.
[KVM switch 1] is associated with the USB-C upstream and [KVM switch 2] is associated with the USB-B upstream.
How to set
-
Press the joystick on the rear of the monitor and move it up, down, left, or right to display the menu.
-
Select [USB hub]-[KVM switch 1], then press the joystick.
-
Select the input of the device to be assigned to [KVM switch 1] and press the joystick. (In the case of the above figure, select [HDMI 1 sync].)
The device is assigned to [KVM switch 1]. (In the case of the above figure, the game console connected to HDMI port 1 is applicable.)
-
Similarly, select [USB hub]-[KVM switch 2], then press the joystick.
-
Select the input of the device to be assigned to [KVM switch 2], then press the joystick. (In the case of the above figure, select [DP sync].)
The device is assigned to [KVM switch 2]. (In the above figure, a computer connected to the DisplayPort terminal is applicable.)
How to switch
-
Press the joystick on the rear of the monitor, move it left to select
 [Input], then press it.
 -
Select the input assigned to [KVM switch 1] or [KVM switch 2].
You can operate the selected device with the USB device connected to this monitor.
Note
- When updating the software of the monitor, connect the computer with the setting software installed to this monitor via USB, and set [KVM switch 1]/[KVM switch 2] correctly.
- The KVM switch can be set only when [Power saving] is set to [Off].
Hint
- To control the selection of input devices, connecting a computer or game console to this monitor with a USB cable is required.

