Recording
Use the receiver attached to a camera and the microphone attached to the subject's clothing for recording sound.
- Turn on the power of the camera and set it in standby mode.
- Turn on the receiver and the microphone.
-
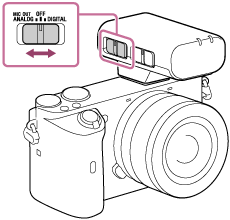
Select your desired audio output with the slide switch (MIC OUT ANALOG/Power OFF/DIGITAL) on the receiver.
-
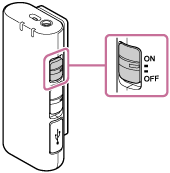
Select “ON” with the power switch on the microphone.
Immediately after both the receiver and the microphone are turned on, the LINK lamps on both devices start blinking slowly in blue. This indicates that each of the devices is making a series of attempts to detect, connect to, and authenticate the other device. When a communication connection is established between the devices and clear audio recording is available, the LINK lamps on both devices stop blinking and stay lit in blue.
If no connection is established, bring the microphone and the receiver closer to each other for another attempt. The devices may be under influence of environmental or other factors.
-
- Ensure that the LINK lamp on the receiver is lit, and press the record start button on the camera.
Note
-
Depending on your camera, the “DIGITAL” audio output may not be supported. For the camera models that support the “DIGITAL” audio output, visit our website at:
-
When the audio output that is not supported by your camera is selected by the slide switch on the receiver, a cautionary message may appear on the camera's finder screen. In such a case, select the supported audio output.
-
While recording is in progress, changing the receiver mode with the mode switch may cause a failure in switching the receiver mode, a failure in audio recording due to disconnected communication, or noise in a recording. Before selecting a receiver mode with the mode switch, be sure to stop the recording.
-
While recording is in progress, changing the audio recording volume with the ATT switch may cause operation sounds of the switch to be recorded. Before selecting an audio recording volume with the ATT switch, be sure to stop the recording.
-
To avoid the possibility of the confirmation beep (Audio signals) at the start of a recording being picked up by this unit, it is recommended that you set [Audio signals] to [Off] on your camera. For further details, refer to the operating instructions of your camera.
-
When using this unit in the MIX mode, if the receiver and microphone pick up the same sound, it causes an echo or clipping noise. Place the microphone farther away from the receiver not to pick up the same sound.
-
When using this unit in the MIX mode, if the power of the microphone turns off or the receiver and microphone are not connected when you start recording, noise or no sound may be recorded. Ensure that the LINK lamps of the receiver and microphone are lit in blue and connection is established, and then start recording.
-
The receiver receives power supply from the camera as well. Depending on your camera, however, it may not be capable of supplying power. For the camera models that support power supply to the receiver, visit our website at: