Switching the sound quality mode
The sound quality is set to the “Priority on sound quality” mode as the default setting.
- When using an SBC, AAC, aptX, or aptX HD compatible device, use with the “Priority on sound quality” mode.
- If the connection is unstable, such as when producing only intermittent sound, select the “Priority on stable connection” mode.
Sound quality and indicator (blue) of each mode
When you switch the sound quality mode, the indicator (blue) flashes to show the current sound quality mode.
- “Priority on sound quality” mode: 3 times
 - - - -
-
SBC, AAC, aptX, or aptX HD is selected automatically.
- “Priority on stable connection” mode: 1 time
-
SBC
- Turn on the headset by pressing the
 button for more than 2 seconds while holding the + or - button down.
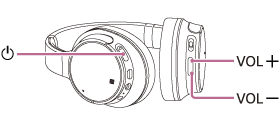
- To select “Priority on stable connection,” turn on the headset while holding the - button down.
- To select “Priority on sound quality,” turn on the headset while holding the + button down.
To check the sound quality mode
While the headset is powered on, press and hold the button, then press the + or - button within 2 seconds (before the power is turned off). The indicator (blue) will flash 3 times (“Priority on sound quality” mode) or 1 time (“Priority on stable connection” mode).
You can switch and check the sound quality mode setting with the "Sony | Headphones Connect" app.
Note
- When you turn on the headset by pressing only the button, the indicator (blue) flashes two times to indicate that the power is on, but the headset does not indicate the sound quality mode with the indicator (blue) flashing.
- The playback time may become shorter depending on the sound quality and the conditions under which you are using the headset.
- Depending on the ambient conditions in the area where you are using the headset, intermittent sound may still occur even if the “Priority on stable connection” mode is selected.