Parts and controls
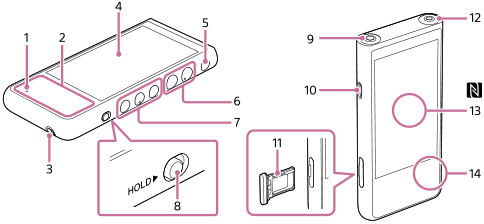
- Charge lamp
The lamp lights up while the player is charging.
- Built-in antenna
The Wi-Fi antenna and Bluetooth antenna are built in. Do not cover the antennas while you use them.
- Strap hole
Attach a strap (not supplied).
- Touch screen
Tap icons or items on the screen to operate the player.
-
 (power) button
- Press the button to turn the screen on or off.
- Hold down the button for 5 seconds to turn on the player.
- Hold down the button for 2 seconds to turn off or restart the player.
- If operations become unstable, hold down the button for 10 seconds to force the player to restart.
- +(*1)/- (volume) buttons
Press the buttons to adjust the volume.
- Playback operating buttons
 (play/pause) (*1): Press the button to start or pause playback.
 (previous track)/
 (next track): Press the buttons to jump to the beginning of the current track, previous track, or next track.
Hold down the buttons to fast-rewind or to fast-forward playback.
-
HOLD (hold) switch
Slide the switch to lock the playback operating buttons and +/- (volume) buttons on the player. You can avoid operating the buttons accidentally.
Locked (inoperable)

Released (operable)

- Headphone jack (Balanced Standard) (*2)
- Connect headphones with a balanced standard plug. Push in the headphone plug until it clicks into place. Connect the headphones properly. Otherwise, the output sound will be impaired.
- Connect passive headphones (*3) to the headphone jack (Balanced Standard) only. If you use an audio cable to connect the headphone jack (Balanced Standard) to the line-in jack of an audio device, it may damage the device.

- USB Type-C port
Connect the USB Type-C cable (supplied).
- microSD card tray
Hook your fingernail in the notch and pull the tray straight out. Set a microSD card (not supplied) inside the tray.
- Headphone jack (Stereo Mini) (*2)
Connect headphones with a stereo mini plug. Push in the headphone plug until it clicks into place. Connect the headphones properly. Otherwise, the output sound will be impaired.
- N-Mark (back side)
Touch the N-Mark on a Bluetooth device to this mark.
The Bluetooth device (such as headphones or a speaker) must support the NFC function.
You can connect the Bluetooth device to the player. - Built-in microphone
You can use the built-in microphone to input sound. Do not cover the microphone while you use it.
*1There are tactile dots on the (play/pause) button and the volume + button. The tactile dots can help you operate the buttons without looking at them.
*2When headphones are connected to both headphone jacks (Stereo Mini and Balanced Standard), output from one headphone jack (Balanced Standard) will be prioritized.
*3Passive headphones: Headphones without a Noise canceling function or Bluetooth function.

The contents of the Help Guide may be subject to change without notice due to updates to the product's specifications.