Cameras screen
This screen appears in the  (Cameras) tab at the bottom of the Creators' App screen.
The content shown here is just an example. The actual screen may differ depending on your camera or on your country or region.
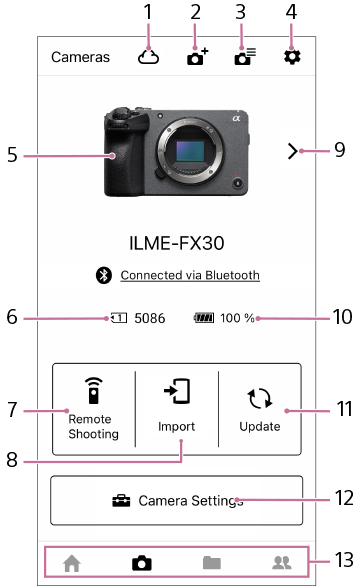
Cameras screen

- Uploading status: Tap to view the history of uploads from the smartphone.
- Add: Tap to add a new camera.
- Camera List: You can view the Help Guide and compatibility information for the camera. Select [Add cameras] to register the camera you are using.
-
Settings:
- [Connection with Camera in Background] (Android only)
- Use this option to set whether to maintain the Wi-Fi connection when Creators' App is in the background. The connection is not maintained in the default settings.
- [Saving Destination] (Android only)
- Selects whether to save images imported to the smartphone to either the internal storage or an SD card.
- [Connect only via Wi-Fi]
- Use this option when connecting the camera and the smartphone only via Wi-Fi settings on the smartphone and not by performing pairing via the Bluetooth function.
- [USB connection]
- You can connect from here when connecting the camera and the smartphone with a USB cable.
- [Delete stored Access Authen. Info]
- Before lending or transferring ownership of cameras that support access authentication, delete the access authentication information.
- Connected camera: Displays the camera connected via the Bluetooth function. You can change the camera name from [Edit Device Name] in the camera menu.
- Information about images on the memory card in the camera
- Remote Shooting: You can use the smartphone as a remote commander to operate the camera from a distant location. See “Remote shooting screen” below.
- Import: You can view images stored on the memory card in the camera and transfer them to your smartphone. See “Importing screen” below.
- Other cameras: If there are multiple cameras that have been paired, you can switch to one of the other cameras.
- Camera battery information
- Update: Shows any available camera system software updates. To update the software, select the update and follow the on-screen instructions. For details, see “Updating the camera’s system software using Creators' App.”
- Cloud Function: By linking the camera to the cloud, you can upload images directly to the cloud from the camera. For details, see “Linking the camera with the cloud.”
-
Functions available with your camera: You can make various camera settings from Creators' App. Some examples are shown below. The availability of settings and the display may vary by country or region and the camera used.
- [Register product]
- Products can be registered to My Sony. Registering allows you to make use of a variety of services related to your product.
- [LUT Management]
- LUT: You can import LUTs saved on your smartphone to the camera.
If a cloud storage service is available in your country or region, you can also import LUTs uploaded in the cloud to the camera.
Visit the following website for supported cameras.
https://www.sony.net/ca/help/camera/- [Saving and applying the camera settings]
- Camera settings can be saved to Creators' App and applied to the camera as needed. You can also apply the settings to other cameras, as long as they are of the same model. For details, see “Saving and applying camera settings.”
- [License Management]
- You can install various licenses on the camera. For details, see “Installing camera upgrade licenses.”
- [Network streaming]
- Configure settings for network streaming from the camera.
- [Monitor & Control]
- Launches Monitor & Control, an app for monitoring and remote control in professional video recording. This will link to the download page if the app is not installed. Only displayed in applicable camera and smartphone versions.
For Monitor & Control product information, visit this website.
https://www.sony.net/ccmc/For Monitor & Control support, visit this website.
https://www.sony.net/ccmc/help/- [Others]
- [Network]
- Camera Wi-Fi settings: You can register Wi-Fi access points to the camera from Creators' App.
- [Setup]
-
Location Information Linkage: By enabling this option, location information from your smartphone can be recorded to images captured by your camera. Additionally, if you enable [Auto Time Correction] and [Auto Area Adjustment], the time and area settings of your smartphone will be automatically reflected on your camera.
To record location information to images transferred to the smartphone, set [Location Information] to [On] in the [Remote Shooting] menu.
- [Differential import settings]
- Automatic importing of camera images to the smartphone will be restricted to images that have not been imported yet. For details, see “Importing camera images.”
- [Transfer notification settings]
- By enabling this option, when you transfer images selected on the camera, a notification will be sent to your smartphone.
- [Unpairing]
- Use this option to disable the information registered for the camera.
-
Switch screens: The appearance varies depending on the smartphone used.
 (Home) screen
 (Cameras) screen
 (Storage) screen: You can view images imported to Creators' App or uploaded to the cloud.
 (Discover) screen: On this website, you can interact with other content creators.
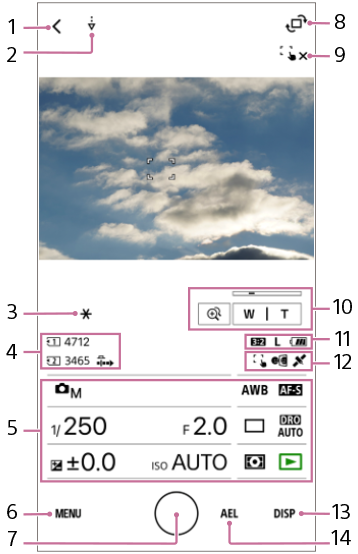
Remote shooting screen

- Return to Cameras screen
- Image acquisition in progress
- AE locked
- Media, media remaining, pre-capture (only included on some cameras)
- Operating panel: Select the desired item and set the value.
- MENU: See “Menu settings” below.
-
Shutter button
 Single shot
 Continuous shooting: If you slide to the left, you can keep the shutter button pressed.
 Cnt Shoot Speed Boost (only included on some cameras)
 Start/stop shooting video
 - Rotate live view
-
Touch operations (only included on some cameras)
 : Touch Focus standby
 : Cancel Touch Focus
 : Touch Tracking standby
 : Cancel Touch Tracking
 : Touch AE standby
 : Cancel Touch AE
 -
Zoom-related operations
 : Step zoom magnification
W/T: Zoom operations
- Aspect ratio, still image size, remaining battery level
- Touch operations, mirror mode, location information acquisition
- DISP: Switch the display mode
- AEL: Lock AE
- In the default settings, captured images are saved to the memory card inside the camera, and images converted to 2M (2 megapixels, approximately 2 million pixels) are automatically transferred to Creators' App. To change the save destination or size, select MENU →
 (Network) → [
 Cnct./PC Remote] or [
 Cnct./Remote Sht.] → [Remote Shoot Setting] on the camera.
 - Videos captured via remote shooting are not transferred to Creators' App.
Menu settings
You can set detailed items in the menu settings. Some examples are shown below. Depending on the camera, some items may not be supported.
- [File Format]
- Specifies the file format of still images to be recorded.
- [Setting of the mode dial operation]
- Dial operations on connected cameras are disabled when this item is set to [Follow the operation from the application]. Use the app to control the camera. When this item is set to [Follow the operation from the camera side], configure camera dial functions on the camera.
- [Save and Apply FTP Settings]
- Camera FTP settings can be saved to Creators' App and applied to the camera as needed. You can also apply the settings to other cameras, as long as they are of the same model. For details, see “Saving and applying camera settings.”
- [Review Image]
- Sets whether or not to display the captured image on the smartphone after shooting.
- [Location Information]
- Adds geotags to images captured remotely and stored on the smartphone, using the smartphone's location information service.
To add location information to images saved on the memory card of the camera, use [Others] → [Setup] → [Location Information Linkage] on the
 (Cameras) screen.
- [Emphasized REC Display]
- The shooting screen can be emphasized during movie recording to provide a clear transition between shooting and standby.
- [Mirror Mode]
- The monitoring screen can be reversed horizontally. This is a convenient function when shooting with the camera pointed toward yourself.
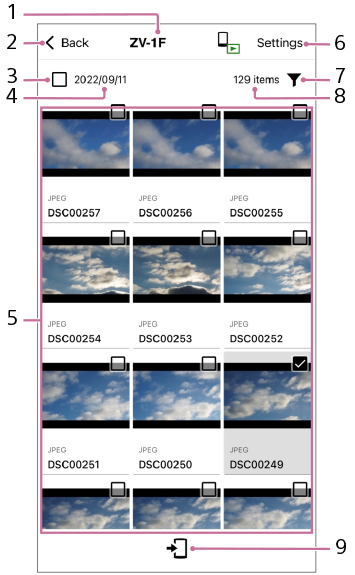
Importing screen

- Connected camera
- Return to Cameras screen
- Select all/Deselect all
- Date of capture
- Images on camera: Displays images stored on the memory card inside the camera. Select an image to view just that image.
-
Settings
: The major functions are as follows. The displayed items and content differ depending on the camera and smartphone used.
- [Import Settings from the Camera]
-
Image Size for Importing
In the default settings, 2M (2 megapixel, approximately 2 million pixels) still images are transferred.
Cutting Videos With Shot Mark
For example, when set to 15 seconds, only the 15 seconds before and after the shot mark portion of the video are clipped and imported.
- Filter: You can filter the displayed images.
- Number of images on the camera
- Transfer: You can transfer selected images to the smartphone.
