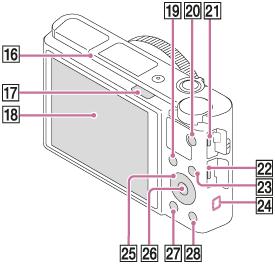
Identifying parts
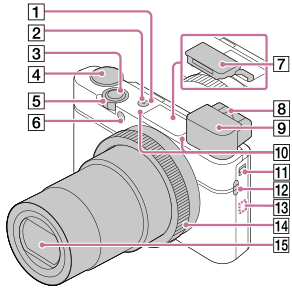
- ON/OFF (Power) button
- Power/Charge lamp
- Shutter button
- Mode dial
 (Auto Mode)/P (Program Auto)/A (Aperture Priority)/S (Shutter Priority)/M (Manual Exposure)/MR (Memory recall)/
 (Movie)/ HFR (High Frame Rate)/
 (Sweep Panorama)/SCN (Scene Selection)
 - For shooting: W/T (zoom) lever
For viewing: (Index) lever/Playback zoom lever
 - Self-timer lamp/AF illuminator
- Flash
- Do not cover the flash with your finger.
- When using the flash, slide the
 (Flash pop-up) switch. If not using the flash, press it down manually.
- Diopter-adjustment lever
- Adjust the diopter-adjustment lever according to your eyesight until the display appears clearly in the viewfinder.
- Viewfinder
- When you look into the viewfinder, the viewfinder mode is activated, and when you take your face away from the viewfinder, the viewing mode returns to the monitor mode.
- Microphone
- Viewfinder pop-up switch
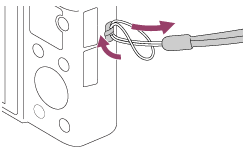
- Hook for strap
- Attach the wrist strap and place your hand through the loop to prevent damage caused by dropping the product.
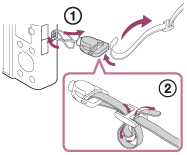
- To use a shoulder strap (sold separately), attach the strap adaptors (supplied) to the strap hooks on either side of the camera.
- Attach the wrist strap and place your hand through the loop to prevent damage caused by dropping the product.
-
 (N mark)
This mark indicates the touch point for connecting the camera and an NFC-enabled Smartphone.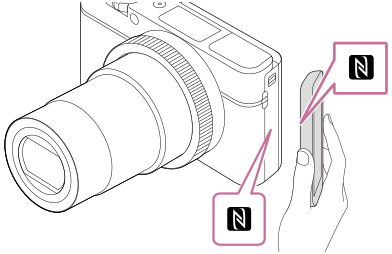
- NFC (Near Field Communication) is an international standard of the short-range wireless communication technology.
- Control ring
- Lens
- Eye sensor
- (Flash pop-up) switch
- Monitor
(For touch operation: Touch panel/Touch pad)- You can adjust the monitor to an easily viewable angle and shoot from any position.
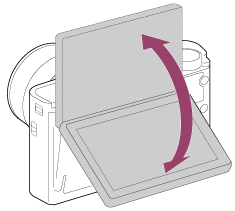
You may not be able to adjust the monitor angle depending on the type of a tripod you use. In such a case, release the tripod screw once to adjust the monitor angle.
- You can adjust the monitor to an easily viewable angle and shoot from any position.
- For shooting: Fn (Function) button
For viewing: (Send to Smartphone) button
 - MOVIE (Movie) button
- Multi/Micro USB Terminal
- This terminal supports Micro USB-compatible devices.
- For details on compatible accessories for the Multi/Micro USB Terminal, visit the Sony website, or consult your Sony dealer or local authorized Sony service facility.
- HDMI micro jack
- MENU button
- Wi-Fi/Bluetooth antenna (built-in)
- Control wheel
- Center button
-
 (Playback) button
 - C/
 (Custom/Delete) button
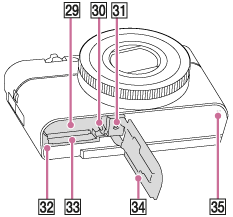
- Battery insertion slot
- Battery lock lever
- Tripod socket hole
- Use a tripod with a screw less than 5.5 mm (7/32 inches) long. Otherwise, you cannot firmly secure the camera, and damage to the camera may occur.
- Access lamp
- Memory card slot
- Battery/Memory card cover
- Speaker
When using the viewfinder
- Slide down the viewfinder pop-up switch.
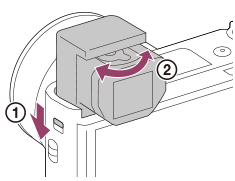
- If you slide the viewfinder pop-up switch when the power is off, the camera turns on.
- To choose whether or not to turn the camera off when the viewfinder is stowed, select MENU →
 (Setup) → [Function for VF close].
- Adjust the diopter-adjustment lever to your eyesight until the display appears clearly in the viewfinder.
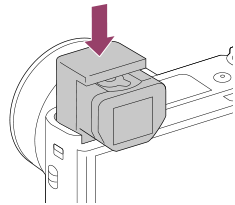
To store the viewfinder
Push down the top of the viewfinder.
Note
- Be careful not to push down on the viewfinder when it is being raised.
- Be sure to push the viewfinder down slowly so that the eyepiece part does not get stuck.