Structure of the Live Screen
The Live screen displays the devices that perform streaming and controls for starting/stopping streaming.
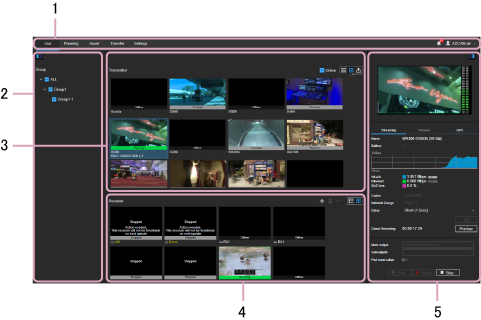
1. Global menu
Click the icons to move between screens.
- Live: Display the Live screen.
- Planning: Display the Planning screen.
- Asset: Display the Asset screen.
- Transfer: Display the Transfer screen.
- Settings: Display the Settings screen.
-
 (Notifications): Displays notifications to the user. Press [Mark all as read] to mark all notifications as read. Press [Delete all] to delete all notifications.
 -
 (Personal setting): Sign out, display account settings, or display the Help Guide.
2. Group selection area
Displays the registered groups.
3. Transmitter area
Displays the transmitters registered in the group selected in the group selection area in thumbnail view or list view.
- [Online] checkbox: Place a check mark here to display only those transmitters that are online.
-
 button: Display the devices in list view.
 -
 button: Display the devices in thumbnail view.
 -
 button: Display the current position of the transmitter on a map.
4. Receiver area
Displays the receivers registered in the group selected in the group selection area in thumbnail view or list view. You can create a cloud receiver here.
Note
- Cloud receivers created in earlier versions cannot be used after subsequent software updates. Re-register the registered cloud receivers. For details about re-registering, “Creating a Cloud Receiver.”
-
 button: Use to display the preferences for the selected receiver and edit settings.
 -
 button: Create a cloud receiver.
 -
 button: Delete a cloud receiver.
 -
button: Display the devices in list view.
-
button: Display the devices in thumbnail view.
5. Streaming information area
When the [Live] tab is selected in the Transmitter area, the following information is displayed.
Preview area
Displays a preview of the streaming content from the device selected in the Transmitter area.
Streaming tab
Displays detailed information about the streaming content.
- Name: Name of the transmitter
- Battery: Battery information
- Intercom: Turns the intercom function on/off. It also displays the status of the intercom function. For details about the status, see “Intercom Operations.”
- (Network Information): Name of the network carrier, type of network, and signal strength used for communication with the camcorder.
- QoS Loss: QoS loss rate
- Codec: Codec to be used for streaming
- Network Range: Select the streaming resolution and maximum bit rate. [Very High], [High], [Middle], [Low], or [Very Low] can be selected. The values available for selection vary depending on the connected camcorder. [Auto] can also be selected in the case of XDCAM pocket. [High(R)] and [High(F)] may be displayed, depending on the transmitter model. [High(R)] and [High(F)] are adjusted for clear, smooth streaming.
- Delay: Select the streaming delay time. [Short], [Middle], [Long], or [Very Long] can be selected (the displayed delay time is an estimate, and may vary from the actual delay time).
- [Set] button: Click to apply changed Codec, Network Range, and Delay settings.
-
Cloud Recording: Displays the duration when recording a stream using a cloud receiver. Clicking the [Preview] button displays a preview of the asset being recorded on the Asset screen.
Note
- The Media Manager, Media Editor, or Media Viewer role is required in order to use the cloud recording function.
- Main Output: Select the receiver to be the main output destination for streaming.
- Sub Outputs: Select the receivers to be sub output destinations for streaming.
-
Port Reservation: Reserve the selected port for streaming by selecting a source and port in [Main Output], and setting the switch to the on position. To cancel the reservation, set the switch to the off position.
Note
- When [Reserve (Auto Streaming)] on the [Settings] screen is set to ON, the port is reserved as a destination and “Auto Streaming” is displayed for the port. For details, refer to the XDCAM air Setup Guide.
- XDCAM pocket does not support the auto streaming function. “Reserved” is displayed regardless of the setting.
- [Start] button: Start streaming.
-
[Rec] button: Record stream to a file. During recording,
 is displayed on the transmitter thumbnail.
 - [Stop] button: Stop streaming.
Remote tab
Controls a camcorder remotely. Set [Camera Control] on to use remote control.
You can switch proxy recording on/off using [NCM with Proxy].
To record using a remote camcorder, set [REC Control] on.
Note
- The [Remote] tab is enabled only when a camcorder that supports remote control is selected.
- Remote recording is supported on PXW-Z280/Z190/FX9 camcorders.
GPS tab
Displays the location information values acquired from a camcorder.