Charging the built-in batteries
Each of the receiver, the microphone, and the charging case contains a built-in lithium-ion rechargeable battery. Connect the charging case and a power source with a USB Type-C cable (commercially available) for battery charging.
Note
-
Before charging the built-in batteries, be sure to turn off the receiver and the microphone.
Battery charging can go on while the receiver and the microphone are turned on. However, placing the receiver and the microphone in the charging case automatically turns them off. This means that the next time you use the receiver and the microphone, you must select “OFF” once with the slide switch on the receiver and with the power switch on the microphone, and then turn them back on.
-
In the event that the receiver and the microphone are removed from the charging case after battery charging is conducted while the receiver and the microphone are turned on, placing them back in the charging case without changing the switch selection does not start battery charging.
- Place the receiver and the microphone in the charging case.
Note
-
Be sure to push in the microphone until it clicks into place. When the microphone is properly seated, its power lamp lights in orange, indicating that the battery charging has started.
ECM-W3
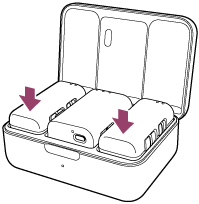
ECM-W3S
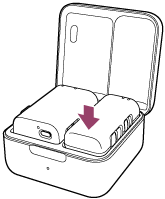
When the receiver and the microphone are properly housed in the charging case, close the lid of the case.
-
- Connect the USB Type-C port on the back of the charging case and a power source with a USB Type-C cable for battery charging.
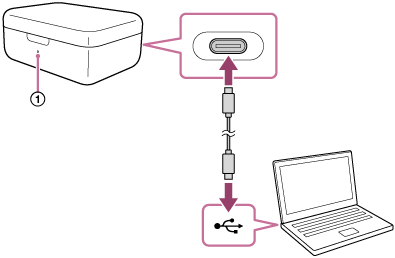
The charging lamp (
 ) on the charging case lights in orange, indicating that battery charging has started.
When the built-in battery of the charging case is fully charged, the charging lamp on the charging case goes out regardless of the battery charging states of the receiver and the microphone housed in the charging case. When the USB Type-C cable is disconnected at this point, battery charging for the receiver and the microphone continues with the battery power of the charging case.
About the battery charging time
In the event of charging the built-in batteries while the receiver and the microphone are housed in the charging case, the built-in batteries of the receiver, the microphone, and the charging case are simultaneously charged via the USB connection.
About 10 minutes of battery charging enables about 30 minutes of use of the receiver and the microphone.
-
Time period required to fully charge the built-in batteries of the receiver and the microphone: about 2 hours*
-
Time period required to fully charge the built-in battery of the charging case: about 2 hours and 30 minutes*
* Time period required for charging the empty rechargeable batteries via the USB charging port (CDP - Charging Downstream Port) on the computer to full capacity. It may vary depending on the using condition.
Charging the built-in batteries of the receiver and the microphone while on the go
The charging case contains a rechargeable battery. By having it charged in advance, you can charge the batteries of the receiver and the microphone when you have no access to a power source, for example, while you are on the go.
-
ECM-W3
The fully charged battery power of the charging case is sufficient for about 1 time charging for all the built-in batteries of the receiver, the microphone No. 1, and the microphone No. 2 from the empty state to the fully charged state.
-
ECM-W3S
The fully charged battery power of the charging case is sufficient for about 2 times charging for the built-in batteries of the receiver and the microphone from the empty state to the fully charged state.
Notes on charging the built-in batteries of the receiver and the microphone while on the go
In the event that the charging lamp on the charging case is blinking in orange when the receiver and the microphone are removed from the charging case, the rechargeable battery of the charging case is running out of power. Charge the battery of the charging case.
Hint
-
To check the battery states of the receiver and the microphone, open the lid of the charging case and see the indication of each power lamp.
For details, see Lamp indications.
To charge the built-in battery of the receiver with the USB Type-C cable
You can alternatively charge the built-in battery of the receiver without using the charging case as described below.
-
Open the lid of the USB Type-C port and connect a USB Type-C cable to the port.
-
Connect the cable to a power source, such as a computer that is up and running, for battery charging.
The power lamp on the receiver lights in orange.
-
When battery charging is finished, disconnect the USB Type-C cable from the receiver.
Wait until the power lamp goes out to indicate that charging is finished (the battery is fully charged).
Note
-
Do not apply excessive force to the receiver when you connect the receiver to a computer. This may cause damage to the receiver or the computer.
-
Connecting the receiver to a laptop computer that is not connected to an AC power source may deplete the battery power of the computer. Do not leave the receiver connected to the computer for an extended period of time.
-
Use of any customized or hand-built computer is not guaranteed for battery charging or for connection with the receiver. Depending on the type of USB device used in combination with the receiver, the receiver may fail to operate.
-
Not all the computers are guaranteed for operation with the receiver.
-
Battery charging via the USB connection may not be possible when the connected computer goes into standby (sleep) or hibernate mode. If this is the case, change the computer settings and then charge the battery all over again.
-
In the event that this unit is kept unused for an extended period of time, the amount of power that each rechargeable battery can charge may be reduced. To make the battery capable of charging sufficient power, let the battery charge and discharge the power repeatedly for a few times. In the event that you store this unit for an extended period of time, charge the batteries once every 6 months to protect them against over-discharging.
-
In the event that this unit is kept unused for an extended period of time, it may take longer to charge the built-in batteries.
-
In the event that any of the rechargeable batteries of this unit fails and the failure is detected while battery charging is in progress, the charging lamp on the charging case stays blinking in orange.
It is recommended that the battery be charged when the ambient temperature is in the range of 15 °C to 35 °C (59 °F to 95 °F). Efficient battery charging may not be possible when the temperature is outside this range.
If the failure persists, consult your nearest Sony dealer.
-
In the event of charging the built-in batteries after this unit is kept unused for an extended period of time, the power lamp or the charging lamp may not immediately light in orange. Wait for a while until the power lamp or the charging lamp lights in orange.
-
A significantly short battery life indicates that the rechargeable battery should be replaced with a new one. Consult your nearest Sony dealer.
-
Keep this unit against exposure to extreme temperature changes, direct sunlight, moisture, sand, dust, and electrical shocks. Never leave this unit in a parked vehicle.
-
When connecting the receiver or the charging case to a computer, be sure to use only the USB Type-C cable and connect them directly. Indirect connection, for example, via a USB hub fails to charge the built-in battery.