Attaching the receiver to a camera
Attach the receiver to a camera.
Note
-
Before attaching the receiver to the camera, charge the built-in battery of the receiver sufficiently enough.
-
Before attaching/removing the receiver to/from the camera, be sure to turn off the receiver and the camera.
- Remove the connector protect holder/stand from the receiver.
Slightly push down and hold the retention latch (
 ) on the connector protect holder/stand, and then pull out the receiver.
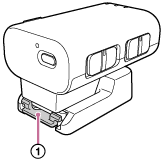
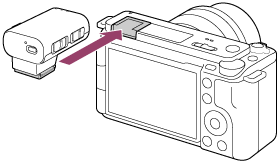
- Align the Multi Interface foot of the receiver with the Multi Interface Shoe on the camera and attach the receiver.
Note
-
Firmly insert the receiver all the way into the Multi Interface Shoe of the camera.
-
If the built-in flash on the camera is popped up, put it down.
-
- Check the position of the slide switch on the receiver.
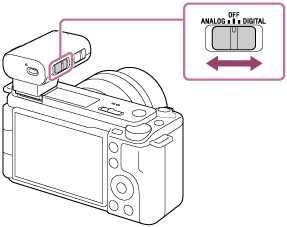
If your camera is compatible with the digital audio interface of the Multi Interface Shoe, make sure that the switch is set to “DIGITAL.” If not, set the switch to “ANALOG.”
If the switch is not set correctly, a compatibility message will be displayed on the camera. For camera models compatible with the digital audio interface of the Multi Interface Shoe, visit the website at:
To remove the receiver
Slide the receiver in the direction opposite to the one for attachment.