Rear side
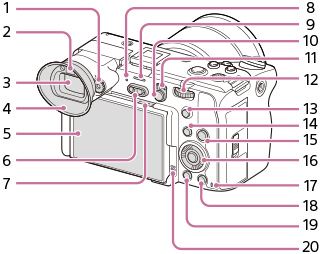
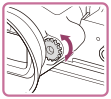
- Diopter-adjustment dial
Adjust the diopter-adjustment dial according to your eyesight until the display appears clearly in the viewfinder.
If it is hard to operate the diopter-adjustment dial, remove the eyepiece cup before operating the dial.
- Eye sensor
- Viewfinder
You can adjust the viewfinder angle to suit the shooting situation.
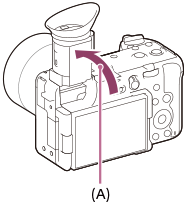
(A): Approx. 90°
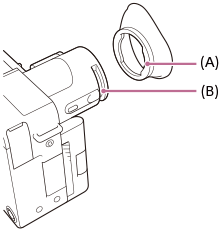
- Eyepiece Cup
To attach the eyepiece cup
Fit the eyepiece cup hook (A) into the groove on the viewfinder (B), and while slightly stretching the eyepiece cup, fit the other side into the same groove.
- Monitor/Touch panel
You can adjust the monitor to an easily viewable angle and shoot from any position.
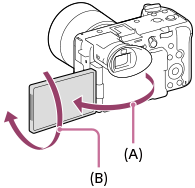
(A): Approx. 176°
(B): Approx. 270°
- You may not be able to adjust the monitor angle depending on the type of a tripod you use. In such a case, release the tripod screw once to adjust the monitor angle.
- Do not apply excessive force when opening, closing, or rotating the monitor. Doing so may cause a malfunction.
- Power switch
- Ventilation inlet
Do not cover the ventilation inlet. The design ensures ventilation even when the monitor is closed.
- Power lamp
- When the camera is in the power-saving mode, the power lamp turns off.
- Before removing the battery pack, make sure that the power switch is set to
 (standby) and the power lamp is turned off. Removing the battery pack while the power switch is set to
  (On) may damage the camera or the memory card.
- Recording lamp
- MENU button
- Still/Movie switch
- Rear dial
You can quickly adjust the settings for each shooting mode.
- 5 button (Custom button 5)
- Fn (Function) button/MODE (Mode) button
- HOME (Home) button
- Control wheel
- Access lamp
- For shooting: 4 button (Custom button 4)
For viewing:
 (Delete) button
 -
 (Playback) button
 - Speaker