Using the Monitor mode in the External monitor app
The Monitor mode in the External monitor app can help you in the following situations:
- Take advantage of the high-definition display of your device by using it as a camera monitor.
- Ensure your subject is in focus by pinching in or out on the screen of your device to zoom in or out.
- Find the best lighting for monitoring in various shooting environments using the Brightness adjustment function.
- You can check the exposure and focus of the input video by displaying waveform, false color, zebra, and peaking info.
- You can record the video that you monitor on your device and use it as a backup if needed.
When using the External monitor app, connect a camera that supports HDMI output or USB Video Class (UVC) output to your device.
Note
- Settings in the Monitor mode such as the brightness level and the orientation of the screen are only for monitoring videos being shot and are not reflected in the live streamed video.
- Videos will be displayed in a limited range on your device regardless of the input range from the connected camera. The luminance and color of the video displayed on your device may be different from the original video depending on the input video and its video format.
Hint
- When 4K video is input from the connected camera, the frame rate is limited to 30 fps via a USB cable and 60 fps via an HDMI cable.
- If the connection with the connected camera is unstable, try using a frame rate of 30 fps. Tap
 (Settings icon) > [Monitor settings] > [Frame rate].
Overview of the Monitor mode in the External monitor app
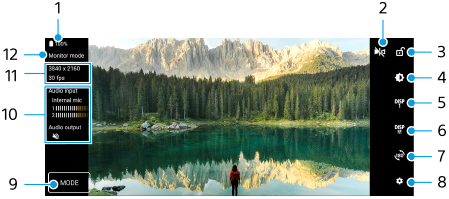
-
Battery status
-
Tap to switch to the mirror mode.
Videos are streamed in the normal view even in the mirror mode.
-
Tap to lock the screen and prevent accidental operations.
-
Tap to adjust the brightness level with the slider.
-
Tap to select the shooting assist option display from among DISP1, DISP2, and OFF.
You can set often-used combinations of shooting assist options as DISP1 or DISP2 by tapping
 (Display shooting assist options icon).
 -
Tap to set the shooting assist options for DISP1 and DISP2, respectively.
Tap the DISP1 or DISP2 tab in the menu that opens, and then tap each switch to show or hide options.
To set details, tap
 (Edit icon).
- [Grid lines]: Select a type of grid line.
- [Frame lines]: Select from various aspect ratios.
- [Waveform]: Select from among various styles of waveform.
- [False color]: Customize false colors and their ranges by tapping (Settings icon). You can customize up to 3 settings.
- [Zebra]: Change the zebra level with the zebra brightness slider.
- [Peaking]: Select a peaking color and level.
-
Tap to rotate the screen 180 degrees.
If a setting other than [Do not specify] is selected for the orientation of the connected external camera in [Settings] > [Device connection] > [Connection preferences] > [Assign an external camera], the image will not rotate, and only the menu display on the screen will rotate 180 degrees.
-
Tap to adjust more detailed settings.
-
Tap to start or stop recording.
-
Tap to select [Monitor mode] or [Streaming mode].
-
Tap the thumbnail to view, share, or edit the recorded videos.
-
Audio status
-
Video format/Frame rate/Remaining recordable time
-
Selected mode
To zoom in or out on the screen
Pinch in or out on the screen.
You can customize the zoom function. Tap (Settings icon) > [Monitor settings], and then adjust settings in the [Zoom] category.