Attaching the main unit to a helmet
Helmets suitable for NYSNO-10
The main unit can be attached to helmets for winter sports. Check if the following conditions are met in the central area on the rear side of the helmet, other than the area where the goggle belt and fixed parts are located.
- There is no irregularity in the area where the adhesive mount will be stuck (46 mm (1.81 in.) in diameter).
- There is no protrusion in the area where the main unit will be attached (length 52 mm × width 143 mm (2.05 in. × 5.63 in.)).
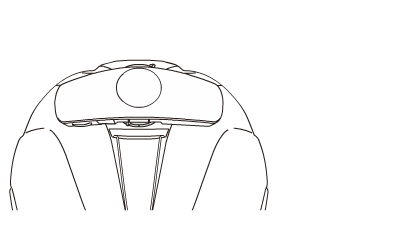
- Determine the attaching position.
- Put the main unit on the helmet with the adhesive mount attached to the main unit and determine the area where the sticking surface has no gap.
- Remove the release paper and press the whole main unit securely against the area you determined in step 1.
To ensure that the adhesion strength is sufficient, check that the sticking surface has no gap.
- Detach the main unit and fix the adhesive mount.
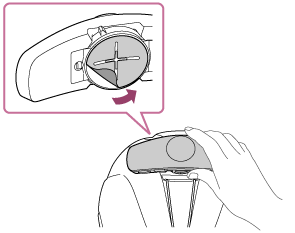
- Turn the lock lever in the direction of the arrow as illustrated and detach the main unit leaving the adhesive mount.
- Tightly stick the adhesive mount with your fingertip.
Press the adhesive mount tightly using a pen cap, etc. to remove air bubbles.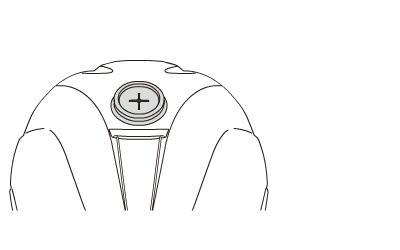
- Put the main unit back on the adhesive mount, turn the lock lever in the opposite direction of step 1. until it clicks, and then attach the main unit on the helmet.

- Turn the lock lever in the direction of the arrow as illustrated and detach the main unit leaving the adhesive mount.
To use the spare adhesive mount
Attach the spare adhesive mount to the main unit as followings.
Turn the lock lever of the main unit to the [RELEASE] side, and then place the adhesive mount with its groove cross-shaped. Turn the lock lever to the [LOCK] side to fix the adhesive mount.

After attaching the adhesive mount to the main unit, do steps  and
and  .
.
Hint
- Allow 24 hours for the adhesive mount to stick securely, with the main unit attached securely.