Mounting the Speakers on a Wall
Note
- Make sure to use the supplied wall mounting brackets when mounting the speakers on a wall. Do not mount the speakers directly onto a wall. Doing so can cause the temperature inside the speaker to rise considerably, and this may cause damage to the speaker or malfunction.
- Prepare screws (not supplied) that are suitable for the wall material and stability. The screw may damage the wall depending on the wall material.
- Fasten the screws securely in the wall beam.
- Hang the wall mounting brackets flat against the reinforced wall.
- Ask a Sony dealer or licensed contractor to install the speakers securely with full consideration of safety.
- Sony shall not be held responsible for accidents or damage caused by improper installation, lack of installation strength, misuse, or natural disaster.
- Do not install the speakers directly under the ceiling. Doing so may obstruct the sound output from the top of the speaker.
- Do not install speakers near metal objects. Wireless functions may become unstable.
- Do not place any obstacles between the speakers.
-
Prepare 16 screws (not supplied) that are suitable for the holes on the wall mounting brackets.
4 screws are required for each speaker.

(a) 4 mm (3/16 in)
(b) Longer than 30 mm (1 3/16 in)
-
Remove the cover on the rear of the speaker.
Flip the cover open downwards, remove the screw with a screwdriver, and remove the cover.
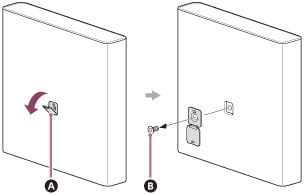
 Cover
Cover
 Screw
Screw
Note
- When installing the speaker, work on a smooth surface such as a table. Working on materials with ridges or with edges to catch onto may damage the speaker.
-
Attach the wall hook (supplied) to the speaker.
Use the screw that was removed in step 2.
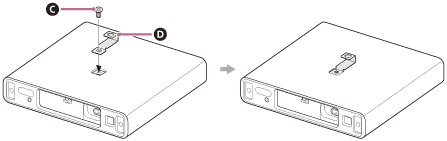
 Screw
Screw
 Wall hook
-
Connect the AC power cord (mains lead) for the speaker (supplied) to the speaker.
Fix the AC power cord (mains lead) that is connected to the speaker to the cable holder on the bottom of the speaker.
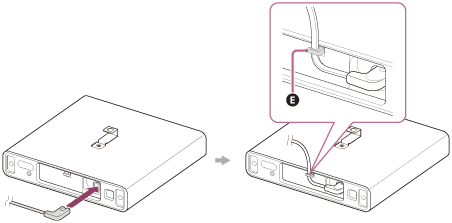
 Cable holder
-
Insert the pins of the wall bracket (L) and (R) (supplied) into the holes of the common base (supplied) to assemble the wall mounting bracket.
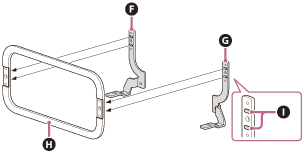
 Wall bracket (L)
 Wall bracket (R)
 Common base
 Pins
Pins
- Decide on the wall mounting position for the speaker and install the wall mounting bracket that was assembled in step 5 for that position.
Install the wall mounting bracket flat against the wall. Secure the 4 locations indicated with the 4 screws (not supplied) that were prepared in step 1.
To avoid dropping the wall bracket, hold down the wall mounting bracket while installing.
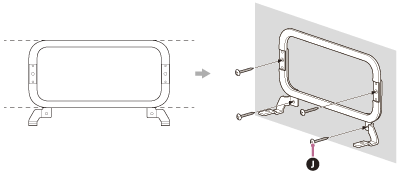
 Screws (not supplied)
-
Confirm the speaker types.
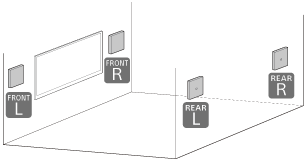
Check the label on the bottom of the speaker to make sure it matches the speaker’s installation position.
-
 : Front left speaker
 -
 : Front right speaker
 -
 : Rear left speaker
 -
 : Rear right speaker
-
-
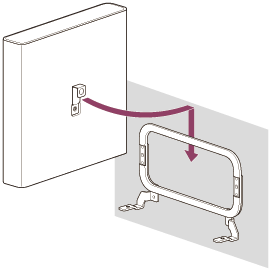
Hang the speaker on the wall mounting bracket.
Hang the wall hook on the rear of the speaker on the wall mounting bracket.
-
Align the positions of the screw holes on the bottom of the speaker with the holes on the wall mounting bracket, then fix the speaker to the wall mounting bracket by fastening the screws (supplied) securely.
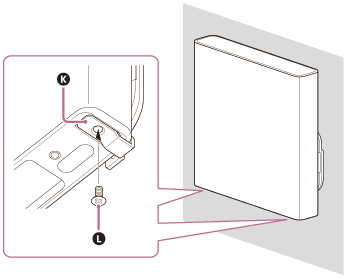
 Wall mounting bracket
 Screw
Screw
-
Connect the AC power cord (mains lead) for the speaker that is connected to the speaker to an AC outlet (mains).
Note
- Keep the cover that is removed in step 2 for covering the screw hole when you do not mount the speaker on a wall.