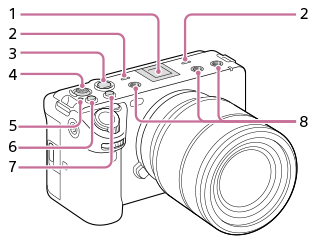
Top side

- Multi Interface Shoe*
Some accessories may not go in all the way and protrude backward from the Multi interface shoe. However, when the accessory reaches the front end of the shoe, the connection is completed.
- Microphone
Do not cover this part during movie recording. Doing so may cause noise or lower the volume.
- REC (Recording) button
When recording is started by pressing the REC (Recording) button, the button lights up in red.
- Multi-selector
-
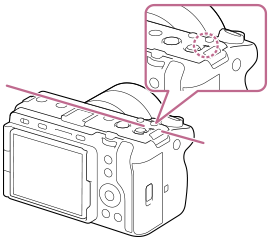
 Image sensor position mark
- The image sensor is the sensor that converts light into an electric signal. The position of the image sensor is indicated by
 (Image sensor position mark). When you measure the exact distance between the camera and the subject, refer to the position of the horizontal line.

- If the subject is closer than the minimum shooting distance of the lens, the focus cannot be confirmed. Make sure you put enough distance between the subject and the camera.
- The image sensor is the sensor that converts light into an electric signal. The position of the image sensor is indicated by
- 3 button (Custom button 3)/ISO (ISO sensitivity) button
- 2 button (Custom button 2)/WB (White balance) button
- Thread holes for accessories
Support 1/4-20 UNC screws
Use an accessory with a screw less than 5.5 mm (7/32 inches) long. Otherwise, you will be unable to firmly secure the accessory, and damage to the camera may occur.
* Accessories for the Accessory Shoe can also be used. Operations with other manufacturers’ accessories are not guaranteed.


