Adjusting the recording volume level
Adjust the recording volume level of the input audio from the INPUT1, INPUT2, or INPUT3 jack.
Note
-
While this unit is attached to the camera, adjustment of the recording volume level on the camera does not work.
-
When connecting this unit to the computer, recording is limited to a maximum of 2-channel.
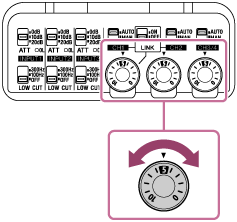
- Set the AUTO/MAN switch of the channel (CH1/CH2/CH3/4) to which the audio signal is output to "MAN."

- Rotate the AUDIO LEVEL dial to adjust the volume to the appropriate level.
Check whether the level is appropriate. You can monitor it via the level meter on the camera or computer, or with headphones by connecting them to the camera or computer.
To automatically adjust the recording volume level
Set the AUTO/MAN switch to “AUTO.”
This setting prevents distortion by automatically lowering the recording volume level when the input audio signal is too large.
Hint
-
To automatically make the recording volume level adjustment for audio output to CH2 follow that of CH1, set the LINK switch to “ON.” This is useful when recording in stereo to CH1 and CH2.
If the AUTO/MAN switch for CH1 is set to “MAN” and the LINK switch is set to “ON,” the AUDIO LEVEL dial for CH2 is disabled. In this case, use the AUDIO LEVEL dial for CH1 instead to simultaneously adjust the recording volume level of the audio output to both CH1 and CH2.
-
For 32bit float recording, the automatic level adjustment of the recording volume level is disabled. The recording volume level is fixed at the level determined by setting the AUTO/MAN switch to “MAN” and the AUDIO LEVEL dial to “5.” As long as no analog clipping occurs, you can record sounds ranging from quiet to loud without distortion.
You can adjust the gain of the recorded file to restore the audio to an optimal, distortion-free level for editing.