Using a microphone (not supplied) or an external audio device
Use a microphone or an external audio device, such as an audio mixer, for recording.
Note
-
Before connecting/disconnecting a device to/from the INPUT1 or INPUT2 jack, be sure to set the INPUT1 (LINE/MIC/MIC+48V) or INPUT2 (LINE/MIC/MIC+48V) switch to the position other than “MIC+48V.” While the switch is set to “MIC+48V,” plugging/unplugging the device may cause a loud noise or a malfunction of the device.
-
When connecting this unit to the computer, recording is limited to a maximum of 2-channel.
-
The microphone shown in the illustration is not supplied.
- Connect your desired device to the INPUT1, INPUT2, or INPUT3 jack on this unit.
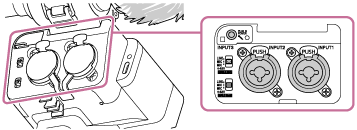
When using either the INPUT1 or INPUT2 jack, connect the device to the INPUT1 jack.
When connecting the device to the INPUT3 jack, proceed to step 3.
- Select an input audio source.
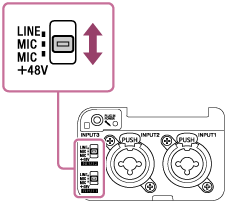
Depending on the device connected to the INPUT1 or INPUT2 jack, set the INPUT1 (LINE/MIC/MIC+48V) or INPUT2 (LINE/MIC/MIC+48V) switch as follows:
-
LINE (Standard input level at +4 dBu (0 dBu = 0.775 Vrms)): An external audio device (e.g., an audio mixer)
-
MIC: A dynamic microphone or a microphone with the built-in battery
-
MIC+48V: A microphone compatible with +48V power (phantom power)
-
- Use the INPUT SELECT switch to select the input audio to be output to each channel on the camera or computer.
You can select the input audio to be output to each channel on the camera or computer from INPUT1, INPUT2, or INPUT3 on this unit.
For details, see “Selecting the input audio for output to each channel on the camera or computer.”
- Use the ATT (INPUT1/INPUT2/INPUT3) switch of the jack to which the device is connected to set the standard input level of the microphone.
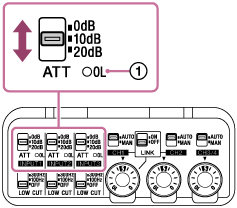
Select the level suitable for the sensitivity of the connected microphone or for the volume level of the input audio.
-
0dB: Suitable for recording with a low-sensitivity microphone while amplifying sounds.
-
INPUT1/INPUT2: Standard input level at –60 dBu
-
INPUT3: Standard input level at –76 dBu
-
-
10dB: Recommended input level for recording human voices.
-
INPUT1/INPUT2: Standard input level at –50 dBu
-
INPUT3: Standard input level at –66 dBu
-
-
20dB: Suitable for recording with a high-sensitivity microphone while keeping the sound volume low.
-
INPUT1/INPUT2: Standard input level at –40 dBu
-
INPUT3: Standard input level at –56 dBu
-
Note
-
Each ATT switch (for INPUT1 and INPUT2) is enabled only when its respective INPUT switch, INPUT1 (LINE/MIC/MIC+48V) or INPUT2 (LINE/MIC/MIC+48V), is set to “MIC” or “MIC+48V.”
When the switch is set to “LINE,” the standard input level is fixed at +4 dBu, so it does not change even if the ATT switch is used.
Hint
-
When the input audio signal is large enough to cause analog clipping, the OL (overload) lamp (
 ) on this unit will light up. In such cases, adjust the input level using the connected device or the ATT switch on the unit so that the lamp does not light up during operation.
-
- Adjust the recording volume level.
For detailed instructions on adjustment, see “Adjusting the recording volume level.”
Hint
-
If the noise from the jacks with no device connected is disturbing, set the INPUT1 (LINE/MIC/MIC+48V) or INPUT2 (LINE/MIC/MIC+48V) switch to “LINE.”