Camera Screen
The camera screen is used to start and stop streaming and recording.
Recording is not supported when M2 Live is selected as the connection destination.
Note
- In Android 11 and later, audio and vibration notifications are turned off while the camera screen is displayed.
- The display varies when using HDMI input or UVC/UAC input on an Xperia device. (see External Input Camera Screen)
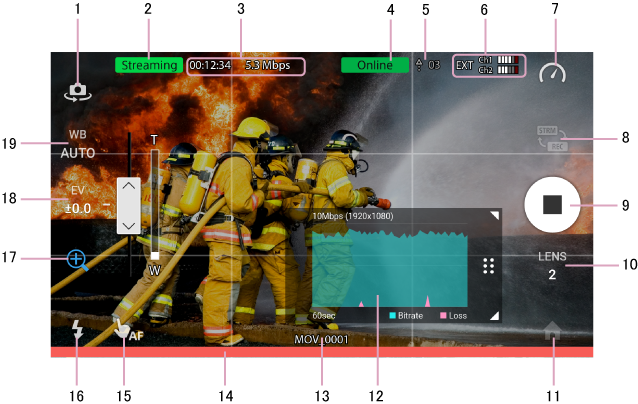
1. Rear/front camera select button
Switch between the rear camera and front camera.
Note
- The camera of the mobile device being used cannot be switched to the front camera if the front camera does not support the frame rates configurable using this application (for example, 60 fps).
2. Streaming/recording icons
 (Streaming): Displayed during streaming.
 (Recording): Displayed during recording. (when C3 Portal or Network RX Station is selected as the connection destination)
3. Streaming/recording status display
During streaming, the elapsed time and bit rate are displayed.
During recording, the elapsed time is displayed. (when C3 Portal or Network RX Station is selected as the connection destination)
4. Connection status indicator
Displays the connection status with the connection destination.
Offline: Not connected.
Connecting: Attempting to connect automatically (when auto connection is enabled).
Online: Connected.
5. Upload indicator
When a file transfer job is registered in the job list, an ![]() (Upload) icon and the number of jobs yet to be completely uploaded are displayed.
(Upload) icon and the number of jobs yet to be completely uploaded are displayed.
Not displayed when connected to M2 Live.
The following two types of upload icon are displayed.
|
|
File transfer is in progress. |
|
|
File transfer is pending because the device is offline or is streaming. |
6. Audio level
Displays the audio level of CH1 and CH2. If an external microphone is connected, the  (external input) icon is displayed.
If using the built-in microphone, the mono/stereo selection and CH1/CH2 assignments for stereo are fixed for each device.
The CH1/CH2 assignments for stereo are fixed, regardless of the orientation of the mobile device.
7. Bit rate graph display switch button (in streaming mode) or clip review (in recording mode)
In streaming mode, the bit rate graph display on/off switch button is displayed.
In recording mode, the most recently recorded clip is displayed. You can tap to display the Preview screen to play the clip.
The clip review is not displayed when M2 Live is selected as the connection destination.
8. Streaming/recording select button
Tap to switch between streaming mode and recording mode.
Not displayed when M2 Live is selected as the connection destination.
9. Start/stop button
When C3 Portal or Network RX Station is selected as the connection destination
The  (Streaming) button is displayed in streaming mode, and the
  (Record) button is displayed in recording mode. During streaming or recording, the button changes to a
  (Stop) button.
In streaming mode, a request is sent to the destination to start/stop streaming. If streaming is available, a bandwidth estimate is performed and then streaming starts. You can also start and stop streaming using the UI for the connection destination.
In recording mode, recording starts/stops.
Note
- When [Enable streaming start/stop button] is turned off on the [Settings] screen, this button is grayed out and you cannot start/stop streaming. In this case, start/stop streaming using the UI for the connection destination.
- In recording mode, if you try to start recording immediately after stopping recording, an encoder error may occur in rare cases and recording may not start. It is recommended that you wait a few seconds after stopping recording before starting recording again.
When M2 Live is selected as the connection destination
Tap the (Streaming) button to start streaming to the connection destination. During streaming, the button changes to a (Stop) button. Tap the (Stop) button to stop streaming.
Streaming cannot be started/stopped from M2 Live.
10. Lens select button
Select which lens to use on a mobile device equipped with multiple lenses.
Lens numbers are assigned from 1 in ascending order of focal length.
Note
- The lens switching operation is not guaranteed on mobile devices whose operation support has not been verified.
11. Home button
When C3 Portal or Network RX Station is selected as the connection destination
Press to display the [Browse] screen, [Job list] screen, or [Settings] screen. Switch screens using the icons along the bottom of the screen.
When M2 Live is selected as the connection destination
Displays the [Return] screen or [Settings] screen. Switch screens using the icons along the bottom of the screen.
12. Program output video
Displays the program output (PGM OUT) video when connected to M2 Live and the program output video display switch button is set to the on position.
Only the video is displayed. Audio output and audio level meter display are not available.
On Android devices, the program output video cannot be displayed on the camera screen.
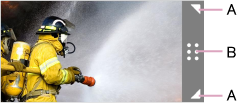
A: Drag to change the size of the video.
B: Drag to move the video.
13. Recording file name
In recording mode, the file name of the currently recording file or the next file to record is displayed.
Not displayed when M2 Live is selected as the connection destination.
The following messages may also appear depending on the situation.
| Clips full | Number of clips has reached the maximum recording limit (1000). |
| Storage full | Insufficient free storage capacity on the mobile device. |
| Storage near full | Remaining free storage capacity on the mobile device is getting low. |
14. Bit rate graph
Displays a bit rate graph for the last 60 seconds in streaming mode when the bit rate graph display switch button is set to the on position.
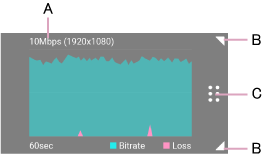
A: Displays the streaming bit rate and resolution configured on the receiving side.
B: Drag to change the size of the graph.
C: Drag to move the graph.
15. Tally
The tally light operates when M2 Live is selected as the connection destination and the connection has “Online” status. In M2 Live, tallies light up below the images set for the program output and preview output.
Red: During program output
Green: During preview output
For details about tallies, see “Tallies.”
16. Program output video display switch button
Switches the display of the program output video on/off when connected to M2 Live.
Not displayed on Android devices.
17. AF select button
Switch between AF (auto focus) and touch AF. During touch AF, tap a point on the screen to focus on that point.
18. Flash button
Turn the flash on/off.
19. Zoom button
Tap to display a slider. Control the zoom using the slider.
20. Exposure correction
Tap to display a slider. Control the exposure using the slider.
21. White balance
Adjust the white balance.
On iOS devices, adjust the white balance using the slider.
On Android devices, adjust the white balance using the supplied presets.