Connecting with a computer via a BLUETOOTH connection (Windows)
Pairing is the process required to mutually register the information on BLUETOOTH devices to be connected wirelessly.
It is necessary to pair a device with the speaker to be able to make a BLUETOOTH connection for the first time. Perform the same procedures to pair to other devices.
Supported operation systems
Windows 10, Windows 8.1
Do the following before starting.
-
Place your computer within 1 m (3 ft) of the speaker.
-
Connect the speaker to an AC outlet via the AC adaptor (supplied) or a USB AC adaptor (commercially available), or charge the built-in battery sufficiently.
-
Prepare the operating instructions supplied with the computer for reference.
-
Stop playback on the computer.
-
Turn down the volume of the computer and speaker to avoid any sudden loud sound output from the speaker.
- Prepare to search for the speaker on the computer.
For Windows 10
Select [
 (Action Center)] - [Connect] in the taskbar on the right-bottom of the screen.
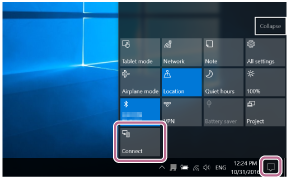
For Windows 8.1
Right-click on [Start], and then click [Control Panel].
When [All Control Panel Items] is displayed, select [Devices and Printers].
If the [Control Panel] screen appears instead of [All Control Panel Items], select [Large icons] or [Small icons] from the [View by] menu in the top right corner of the screen.
- Turn on the speaker.
The
 (power) indicator lights up in white*1.
*1 Depending on the Sound Mode, the color of the
(power) indicator varies. For details, refer to the following topic.
About the indicators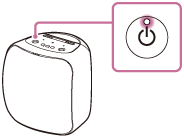
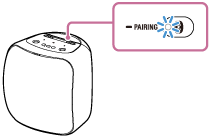
- After the Google Assistant setup is complete, press and hold the
 (BLUETOOTH) button/
 PAIRING button until the (BLUETOOTH) indicator starts flashing quickly.
The speaker enters pairing mode.
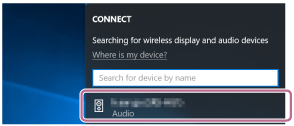
- Search for the speaker on the computer.
Connecting the speaker to the computer via a BLUETOOTH connection
For Windows 10
-
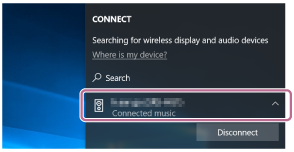
Select [Connect] in the Action Center on the right-bottom of the screen.

-
Select the name of the speaker you set up for Google Assistant.
If the speaker's name does not appear on the screen, repeat the procedure from step
 .
.After pairing, the BLUETOOTH connection establishes automatically and [Connected music] will be displayed on the screen. Proceed to step
 .
.
For Windows 8.1
-
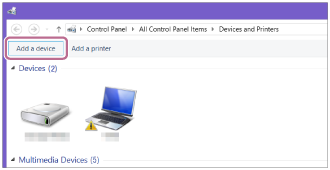
Click [Add a device].
-
Select the name of the speaker you set up for Google Assistant and click [Next].

If a passkey*2 is required, enter “0000.”
If speaker's name does not appear, perform the operation again from step
.*2 The passkey may be called a “passcode,” “PIN code,” “PIN number,” or “password.”
-
When the following screen appears, click [Close].
The computer begins installing the driver.
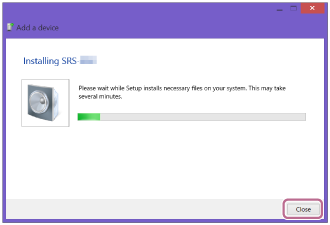
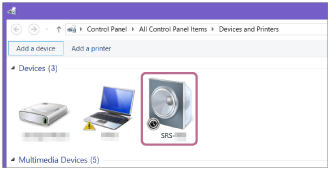
The “
 ” mark will appear in the bottom left of the speaker icon during installation. When the “” mark disappears, driver installation is complete. Proceed to step
 .
.
-
- Register the speaker to the computer.
For Windows 10
After pairing, the BLUETOOTH connection establishes automatically and [Connected music] will be displayed on the screen. Proceed to step
.For Windows 8.1
-
Right-click on the name of the speaker you set up for Google Assistant in [Devices] and select [Sound settings] from the menu that appears.

-
Confirm the speaker's name on the [Sound] screen.
-
If there is a checkmark (green) on the speaker icon, proceed to step
.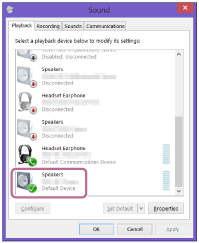
-
If there is not a checkmark (green) on the speaker icon, proceed to the next step (substep 3).
-
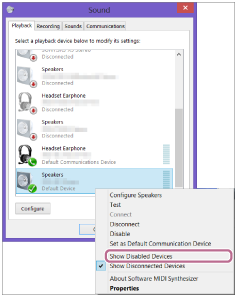
If the name of the speaker you set up for Google Assistant does not appear, right-click on the [Sound] screen, and select [Show Disabled Devices] from the menu that appears. Then proceed to the next step (substep 3).
-
-
Right-click on the speaker's name, and select [Connect] from the menu that appears.
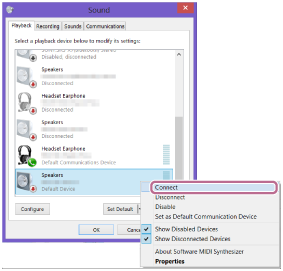
When the speaker is connected, a checkmark will appear on the speaker icon on the [Sound] screen. Proceed to step
.
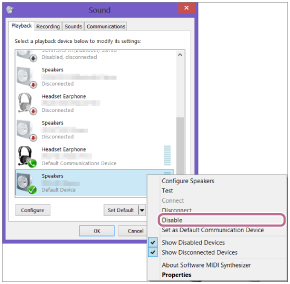
If you cannot click [Connect] for the speaker, select [Disable] for the [Default Device] that currently has a checkmark (green).
-
- Follow the instructions on the BLUETOOTH device screen to establish a BLUETOOTH connection.
When the BLUETOOTH connection is established, the
(BLUETOOTH) indicator switches from flashing to a steady light.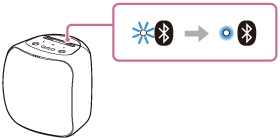
Hint
-
The procedure explained above is for guidance only. For details, refer to the operating instructions supplied with the computer.
-
With the previously connected BLUETOOTH device, you can establish a BLUETOOTH connection simply by pressing the
(BLUETOOTH) button/
PAIRING button on the speaker, provided that the BLUETOOTH function is active on the BLUETOOTH device.
Note
-
The
(BLUETOOTH) button/ PAIRING button is disabled before the Google Assistant setup is complete. -
The speaker goes out of BLUETOOTH pairing mode in about 3 minutes and the
(BLUETOOTH) indicator goes out. -
Once the speaker is paired with the computer, there is no need to pair them again, except in the following cases:
-
Pairing information is deleted due to repair work, etc.
-
The pairing information of the speaker is deleted from the computer.
-
The speaker is initialized.
All pairing information will be deleted.
-
-
The speaker can be paired with multiple devices, but can only have a BLUETOOTH connection with one paired device at a time.
-
The passkey of the speaker is “0000.” If a passkey besides “0000” is set on the computer, pairing with the speaker fails.