Identifying parts
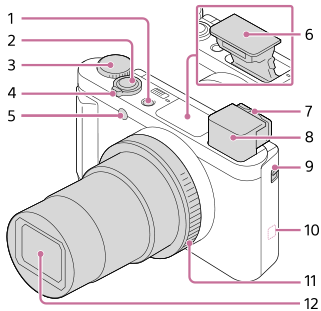
- ON/OFF (Power) button
- Shutter button
- Mode dial
- For shooting:W/T (zoom) lever
For viewing: (Index) lever/Playback zoom lever
 - Self-timer lamp/AF illuminator
- Flash
- Do not cover the flash with your finger.
If not using the flash, press it down manually.
- Do not cover the flash with your finger.
-
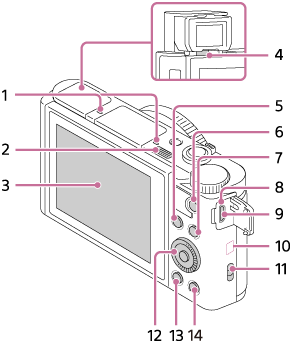
Diopter-adjustment lever
- Move the diopter-adjustment lever until the image is clear in the viewfinder.
-
Viewfinder
- When you look into the viewfinder, the viewfinder mode is activated, and when you take your face away from the viewfinder, the viewing mode returns to the monitor mode.
- Viewfinder pop-up switch
-
 (N mark)
- Align this mark when you connect the camera to a smartphone with an NFC function. For details, refer to the operating instructions supplied with your smartphone.
- NFC (Near Field Communication) is an international standard of the short-range wireless communication technology.
- Control ring
- Lens
- Microphone
-
 (Flash pop-up) switch
- When using the flash, slide the (Flash pop-up) switch.
- When using the flash, slide the
-
Monitor
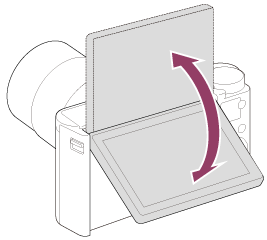
(For touch operation: Touch panel/Touch pad)- When shooting from low angles or shooting self-portraits, adjust the monitor angle.
- Eye sensor
- For shooting: Fn (Function) button
For viewing: (Send to Smartphone) button
 - MOVIE (Movie) button
- MENU button
- Charge lamp
- Multi/Micro USB Terminal
- This terminal supports Micro USB-compatible devices.
- Wi-Fi/Bluetooth antenna (built-in)
- Hook for strap
- Attach the wrist strap and place your hand through the loop to prevent damage caused by dropping the product.

- Attach the wrist strap and place your hand through the loop to prevent damage caused by dropping the product.
- Control wheel
-
 (Playback) button
 - C/
 (Custom/Delete) button
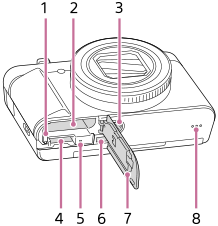
- Battery lock lever
- Battery insertion slot
- Tripod socket hole
- Use a tripod with a screw less than 5.5 mm (7/32 inches) long. Otherwise, you cannot firmly secure the camera, and damage to the camera may occur.
- Memory card slot
- Access lamp
- HDMI micro jack
- Battery/Memory card cover
- Speaker
When using the viewfinder
- Slide down the viewfinder pop-up switch (A).

- If you slide the viewfinder pop-up switch when the power is off, the camera turns on.
- To choose whether or not to turn the camera off when the viewfinder is stowed, select MENU →
 (Setup) → [Function for VF close].
- Grasp both sides of the eyepiece (B) and pull it towards the monitor side until it clicks.
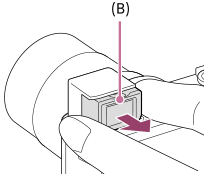
- Adjust the diopter-adjustment lever to your eyesight until the display appears clearly in the viewfinder.
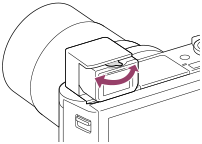
To store the viewfinder
Grasp both sides of the eyepiece and push it back into the viewfinder until it clicks. Then push down the viewfinder.
Note
- Be careful not to push down on the viewfinder when it is being raised.
- Be sure that the eyepiece is stored in the viewfinder unit before attempting to push down the viewfinder. If it is not stored and you try to force the viewfinder down, a malfunction may result.