Edit Mode Window
The following describes the Edit Mode window.
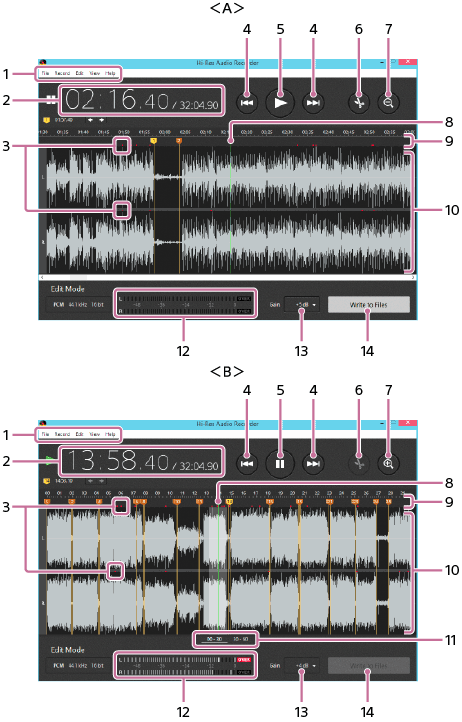
A: Edit Mode window with the zoomed-in waveform drawing area
B: Edit Mode window with the zoomed-out waveform drawing area
-
Menu bar
Provides selectable menu options for various operations. For detailed information, see “Using the Menu Bar (On Windows).”
For the menu options on Mac, see “Using the Menu Bar (On Mac).”
-
Time display
Displays the time indicating the playing point in the temporary file on the left; and the total duration of the temporary file on the right.
-
OVER point indicator
Appears at every exact point where the signal level of the recorded audio tracks reaches 0 dB (OVER point). When playback reaches one of these OVER points,
 lights at the right end of both or either of the signal level meter bars as well.
 -
 (Previous Marker) button/
 (Next Marker) button
Moves the playback cursor to the marker immediately before or after the current cursor position when you click either of these buttons while the playback is paused.
While the playback is in progress, clicking one of the buttons starts playing the temporary file from the marker immediately before or after the current cursor position.
While the duration of the playback from the previous marker is within 5 seconds, clicking the
(Previous Marker) button for the second time starts playing the temporary file from the marker immediately before the previous one. -
 (Start Playing) button
Starts playing the audio tracks recorded in the temporary file.
Clicking the button changes the button appearance to
 (Pause Playing). To pause the playback, click the button once again.
 -
 (Add Marker) button
Adds a marker to the playback cursor position when you click this button while the playback is paused.
-
 (Zoom In) button/
 (Zoom Out) button
Zooms in/out the waveform drawing area.
-
Playback cursor
Indicates the playing point in an audio track recorded in the temporary file.
-
Add markers area
You can move the pointer and click to add a marker at the pointer position.
-
Waveform drawing area
Displays waveforms of the audio tracks recorded in the temporary file. Clicking on a waveform moves the playback cursor to the clicked position.
Double-clicking on a waveform starts playing the temporary file from the point that matches the double-clicked position.
-
Page selection buttons
Display the respective pages of the temporary file in the waveform drawing area.
Up to 4 buttons (“00 - 30,” “30 - 60,” “60 - 90,” and “90 - 100”) appear according to the duration of the recording.
-
Signal level meter bars
While playback of the recorded audio tracks is in progress, the signal level meter bars lengthen or shorten according to the left and right signal levels of the audio tracks.
When playback reaches one of the points where the signal level reaches 0 dB (OVER point),
lights.The indicator for the peak level and
remains lit for a certain period of time. -
Gain selection button
While playback of the recorded audio tracks is paused, you can click this button to select a value for the signal level (gain).
-
Write to Files button
Displays the Write to Files window when you click this button upon completion of the editing.