Pairing with a computer (Windows)
Pairing is the process required to mutually register the information on BLUETOOTH devices to be connected wirelessly.
It is necessary to pair a device with the speaker to be able to make a BLUETOOTH connection for the first time. Perform the same procedures to pair to other devices.
Supported operation systems
Windows 10, Windows 8.1
Do the following before starting.
-
Place your computer within 1 m (3.3 feet) of the speaker.
-
Connect the speaker to an outlet via the AC adapter (supplied).
-
To avoid any sudden loud sound output from the speaker, turn down the volume of the computer and speaker that you connect with each other, or stop playback.
-
Set the speaker of your computer to on.
If the speaker of your computer is set to
 (mute), sound does not output on the BLUETOOTH speaker.
-
When the speaker of your computer is set to on:

-
- Prepare to search for the speaker on the computer.
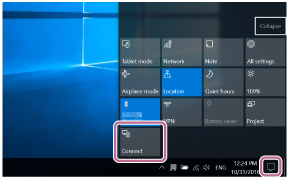
For Windows 10
Select [
 (Action Center)] - [Connect] in the taskbar on the right-bottom of the screen.
For Windows 8.1
Right-click on [Start], and then click [Control Panel].
When [All Control Panel Items] is displayed, select [Devices and Printers].
If the [Control Panel] screen appears instead of [All Control Panel Items], select [Large icons] or [Small icons] from the [View by] menu in the top right corner of the screen.

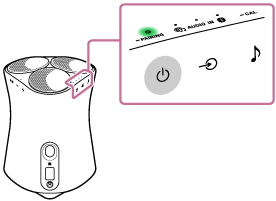
- Touch the
 (Power)/
 PAIRING button to turn on the speaker.
The Power indicator (green) lights up.
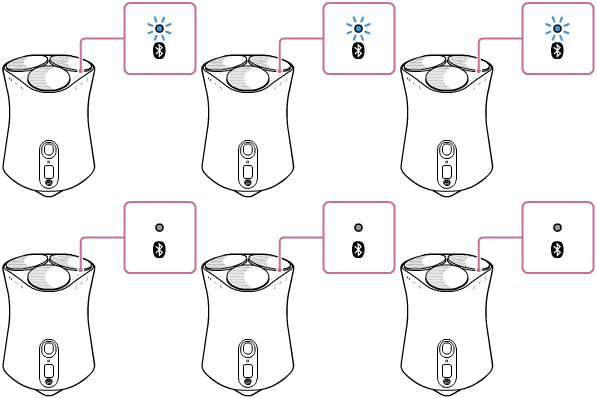
- Touch and hold the speaker’s
 (Power)/
 PAIRING button for more than 2 seconds.
The BLUETOOTH indicator (blue) flashes quickly and the speaker enters pairing mode.
Hint
-
If the BLUETOOTH indicator does not flash, the speaker may already be connected to the BLUETOOTH device. If this is the case, once you have turned off the speaker, do the operations for pairing again.
-
- Search for the speaker on the computer.
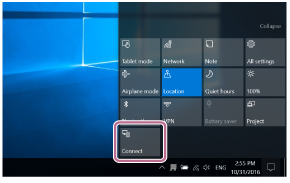
For Windows 10
-
Select [Connect] in the Action Center on the right-bottom of the screen.
-
Select the speaker's name ([SRS-RA5000] or the one you provided during the Wi-Fi network setup).
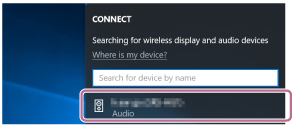
If the speaker's name does not appear on the screen, repeat the procedure from step
 .
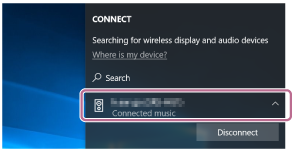
.After pairing, the BLUETOOTH connection establishes automatically and [Connected music] will be displayed on the screen. Proceed to step
 .
.
For Windows 8.1
-
Click [Add a device].
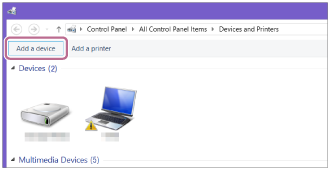
-
Select the speaker's name ([SRS-RA5000] or the one you provided during the Wi-Fi network setup), and then click [Next].

If a passkey* is required, enter “0000.”
If speaker's name does not appear, perform the operation again from step
 .
.* The passkey may be called a “passcode,” “PIN code,” “PIN number,” or “password.”
-
When the screen for driver installation appears, click [Close].
The computer begins installing the driver.

The “
 ” mark will appear in the bottom left of the speaker icon during installation. When the “
 ” mark disappears, driver installation is complete. Proceed to step
 .
.
-
-
Register the speaker to the computer.
For Windows 10
After pairing, the BLUETOOTH connection establishes automatically and [Connected music] will be displayed on the screen. Proceed to step
 .
.For Windows 8.1
-
Right-click on the speaker's name ([SRS-RA5000] or the one you provided during the Wi-Fi network setup) in [Devices], and then select [Sound settings] from the menu that appears.
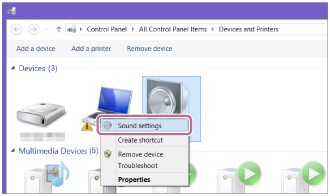
-
Confirm the speaker's name on the [Sound] screen.
-
If there is a checkmark (green) on the speaker icon, proceed to step
 .
.
-
If there is not a checkmark (green) on the speaker icon, proceed to step
 -3.
-3. -
If the speaker's name ([SRS-RA5000] or the one you provided during the Wi-Fi network setup) does not appear, right-click on the [Sound] screen, and select [Show Disabled Devices] from the menu that appears. Then proceed to step
 -3.
-3. 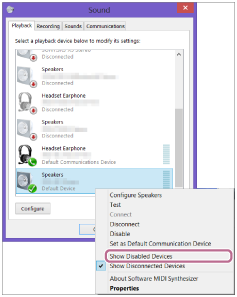
-
-
Right-click on the speaker's name, and select [Connect] from the menu that appears.

When the speaker is connected, a checkmark will appear on the speaker icon on the [Sound] screen. Proceed to step
 .
.
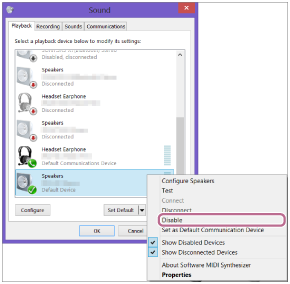
If you cannot click [Connect] for the speaker, select [Disable] for the [Default Device] that currently has a checkmark (green).
-
-
Confirm that the BLUETOOTH connection is complete.
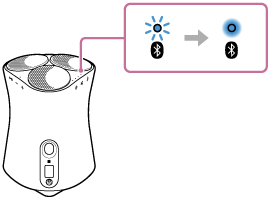
When the BLUETOOTH connection is established, the speaker beeps and the BLUETOOTH indicator switches from flashing to a steady light.
Hint
-
The procedure explained above is for guidance only. For details, refer to the operating instructions supplied with the computer. However, operation with all computers is not guaranteed. Operation with a home-built computer is also not covered by the warranty.
Note
-
If the speaker goes out of BLUETOOTH pairing mode before you finish the procedure and the name of the speaker does not appear on the BLUETOOTH device screen, repeat the procedure from step
 .
. -
Once the speaker is paired with the computer, there is no need to pair them again, except in the following cases:
-
Pairing information is deleted due to repair work, etc.
-
The pairing information of the speaker is deleted from the computer.
-
The speaker is initialized.
All pairing information will be deleted.
-
- The passkey of the speaker is “0000.” If a passkey besides “0000” is set on the computer, pairing with the speaker fails.

