Charging the battery pack using the supplied charger
Prepare the following commercially available products that support USB PD (USB Power Delivery).
- USB Type-C cable (USB-C® – USB-C) supporting 45 W or more
- External power supply supporting output of 45 W or more
For details on the supported output of USB Type-C cables and external power sources, refer to the following website.
- Insert the battery pack into the battery charger, and then connect the battery charger to an external power supply (USB-PD-compatible) using a commercially available USB Type-C cable (USB-PD-compatible).
- The STATUS lamp (A) will light up before charging starts, and charging will start after the STATUS lamp turns off. If the STATUS lamp does not light up and charging does not start, make sure the battery pack is securely inserted.
- Charging is also possible when using an external power supply with output of 18 W or more and less than 45 W, but charging may take a long time when charging two batteries at once.
- If you use an external power supply or USB Type-C cable with specifications other than those described above, charging may not be performed properly.
- If two batteries are inserted into the battery charger, they will be charged simultaneously.
- Depending on the external power supply, the STATUS lamp may flash repeatedly before charging starts. However, once the STATUS lamp turns off and the charging status indicator lamps (B) stay lit or flash, charging will proceed normally.

Charging status indicator lamps
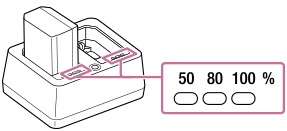
The charging status indicator lamps indicate the approximate charging status, as shown in the table below. (The orange color represents lighting.)
| Charging status | Charging status indicator lamps |
|---|---|
| 0% - 50% |
|
| 50% - 80% |
|
| 80% - Fully charged |
|
| Full charging completed |
|


The charge level shown by the charging status indicator lamps and the percentages in the above table are rough guides.
Approximate charging time (Full charge)
| Number of batteries to be charged | Full charge time (Output of the cable and external power supply used) |
|---|---|
| 1 | Approx. 85 min. (27 W or more) |
| 2 | Approx. 115 min. (45 W or more) |
- The above charging time applies when charging a fully depleted battery pack at a temperature of 25°C (77°F) using the supplied charger.
- The charging time stated above may differ depending on the ambient temperature, the condition of the battery pack, and the USB Type-C cable or external power supply you are using.
- If you charge a battery that has not been used for a long time, the charging time may be longer.
Checking the battery status

While you press the BATTERY HEALTH button, the STATUS lamp lights up, and you can check the battery status via the charging status indicator lamps.
| Battery status | Charging status indicator lamps |
|---|---|
| Good |
|
| Slight deterioration |
|
| Deterioration (replacement recommended) |
|


Hint
- You can also check the battery status on the camera by using [Battery Information]. Insert the battery pack into the camera and select [Battery Information].
Note
- Use a nearby wall outlet (wall socket) when using the external power supply. If any malfunction occurs, disconnect the plug from the wall outlet (wall socket) immediately to disconnect from the power source.
- Before charging, be sure to also read “Notes on the battery pack and charging the battery.”
TP1002214780