Sides
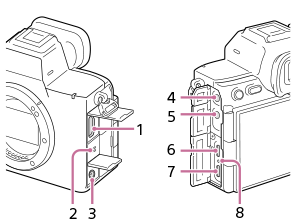
- HDMI type A jack
- Speaker
-
 (Flash sync) terminal
 -
 (Microphone) jack
When an external microphone is connected, the built-in microphone turns off automatically. When the external microphone is a plugin-power type, the power of the microphone is supplied by the camera.
-
 (Headphones) jack
 - USB Type-C® terminal (USB PORT 1)
This port supports the single-screw locking mechanism.
- USB Type-C terminal (USB PORT 2)
- Charge lamp
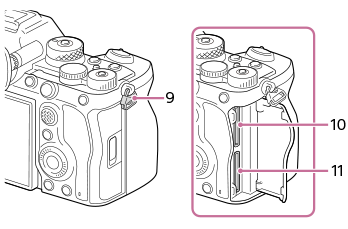
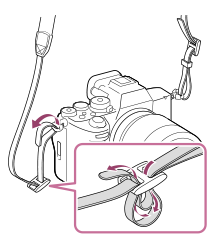
- Hooks for shoulder strap
Attach both ends of the strap onto the camera.
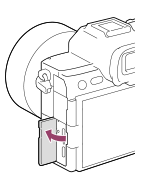
- SLOT 1 (Memory card slot 1)
- SLOT 2 (Memory card slot 2)
Notes on USB terminals
- Only the USB Type-C terminal of USB PORT 1 supports SuperSpeed USB 10 Gbps (USB 3.2). It is recommended to use USB PORT 1 when connecting the camera to a device such as a computer.
You can also connect the camera to a device such as a computer using USB PORT 2, but USB communication will be Hi-Speed USB 480 Mbps (USB 2.0) communication. - You can use either of the USB Type-C terminals, USB PORT 1 or USB PORT 2, for power supply or charging. The charging time is the same regardless of which terminal you use.
- USB communication and power supply can be performed simultaneously by using two USB Type-C terminals. In this case, use USB PORT 1 for USB communication and USB PORT 2 for power supply.
Notes on the terminal cover
Ensure that the terminal cover is closed before use.
Notes on the cable clamper
Use the cable clamper to prevent cables from becoming disconnected when shooting images with cables connected, such as a USB cable or an HDMI cable.
To attach the cable clamper
- Open the USB terminal cover.
- Attach the cable clamper as illustrated so that it fits the shape of the terminal surface of the camera.
- Attach the cable clamper by inserting the open USB terminal cover into the slit of the cable clamper.
- When using the HDMI or (Headphones) jack, open the terminal cover before attaching the cable clamper.
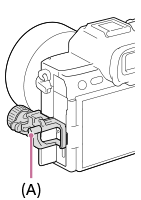
- Push in the attachment screw (A) and turn it to secure the cable clamper.
- Pinch the detaching knob of the cable-holding part (B) and detach it.

- After removing the fixing dial (C) from the detached cable-holding part, insert the cable through the holding part, and then secure the cable with the fixing dial.
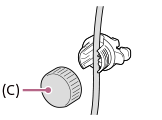
- Reattach the cable-holding part to the cable clamper.
- Push the cable-holding part in until it locks.
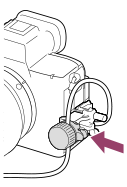
Example when attaching a USB cable
To remove the cable clamper
Loosen the attachment screw and then remove the cable clamper.
TP1002214764