Digital Paper App (dedicated app) screen
The Digital Paper App must be used to operate the Digital Paper with your computer.
After connecting the computer to the Digital Paper, launch the Digital Paper App on your computer.
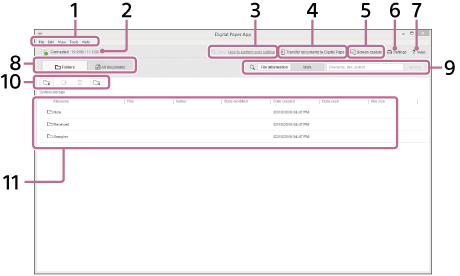
- Menu
Operate the Digital Paper App from the menu. - Connection status with the Digital Paper and empty space/total available space
- Execute sync. Will not operate if the sync folder is not set.
- [Transfer documents to Digital Paper]
Transfer documents from the computer to the Digital Paper. - [Screen capture]
Display the screen of Digital Paper on the computer. Also, save the screen of Digital Paper as an image on the computer. - [Settings]
Change the settings. - [Help]
Display this Help Guide or open the product support website. - [Folders]/[All documents]
Switch the screen display on the Digital Paper App. - [File information]/[Mark]/[Search]
Search for documents within the Digital Paper. -
 (New folder)
Create a new folder on the Digital Paper. Click [Folders] and open a folder on your Digital Paper before creation.
 (Transfer documents to computer)
Transfer documents from the Digital Paper to the computer.
 (Delete)
Delete folders and documents from the Digital Paper.
 (Set sync folder)
Set the sync folder. - Documents/Folders* list
- You can change the display order of the list by clicking on an item title.
- You can confirm whether a file is a document, note, etc. based on the icon.
 : Document
 : Document to sync
 : Note
 : Note to sync
 : Unread document/note
 : Folder
: Folder to sync - Right-click on an item to display a menu of available operations based on the situation.
- When you double-click on a folder name, the display switches to that folder.
*Folders are only displayed when the Digital Paper App is in Folder view.