


Structure of the File Transfer Screen
Use the File Transfer screen to assign a transfer preset (export destination for files uploaded to PWA-RXS) for each transmitter (camera, app installed on smartphone/portable data transmitter (Creators' App for Enterprise), or LiveU transmitter). You can also check the upload status from the transmitter to the PWS-RXS, and the progress of transfer jobs (export process from the PWS-RXS to the external destination server).
For details about configuring the destination server, see “Configuring the Destination Server.” For details about configuring transfer presets, see “Configuring Transfer Presets.”
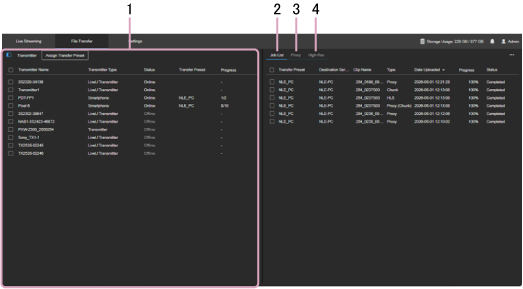
1. [Transmitters] area
Displays the file transfer transmitters in list view.
- [Assign Transfer Preset] button: Assigns transfer presets to transmitters.
2. [Job List] tab
Use to check the status and progress of file transfer jobs from PWS-RXS to the external destination server and to manage the process.
3. [Proxy] tab
Displays a list of proxy clips for transmitters that are cameras connected in network client mode. Select the clips to upload to PWA-RXS by placing a check mark in the checkbox for each clip.
The file upload destination is the internal FTP server of PWA-RXS.
- [Transfer] button: Uploads the selected clips to PWA-RXS.
4. [High-Res] tab
Displays a list of high-resolution clips for transmitters that are cameras connected in network client mode. Only clips recorded in parallel (proxy clips recorded simultaneously) can be previewed. Select the clips to upload to PWA-RXS by placing a check mark in the checkbox for each clip.
The file upload destination is the internal FTP server of PWA-RXS.
- [Transfer] button: Uploads the selected clips to PWA-RXS.