


Structure of the Settings Screen
Use the Settings screen to configure the connection manager, transmitters (cameras, app installed on smartphones/portable data transmitters (Creators' App for Enterprise), or LiveU transmitters), and receivers. Use the tabs at the top of the screen to switch between pages.
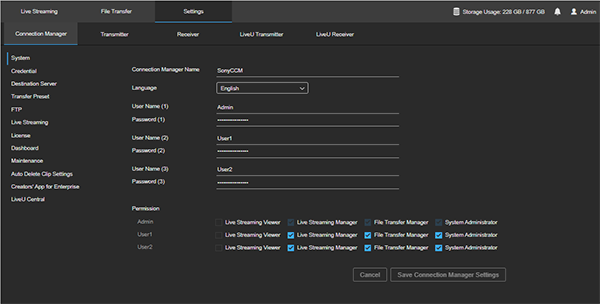
[Connection Manager] tab
Configures connection manager settings.
[System]
- Connection Manager Name: Enter the name of the connection manager.
- Language: Selects the display language of the connection manager.
- User Name (1): Enter the administrator user name for signing in to the connection manager.
- Password (1): Enter the password for the user name above.
- User Name (2) / User Name (3): Enter a general user name for signing in to the connection manager. Two general users can be configured.
- Password(2) / Password(3): Enter the password for the user names above.
-
Permission: Sets the privileges for each user. Place a check mark to grant privileges.
- Live Streaming Viewer: Grants permission to view live streaming to a user.
- Live Streaming Manager: Grants permission to control live streaming to a user.
- File Transfer Manager: Grants permission to control file transfer to a user.
- System Administrator: Grants permission to manage settings to a user.
[Credential]
Configures the settings for signing in to the connection manager from transmitters and receivers.
Transmitter
- User Name (1) / User Name (2): Enter a user name for signing in to the connection manager from a camera. Two users can be configured.
- Password(1) / Password(2): Enter the password for the user names above.
- Port: Sets the TCP port number used when connecting to the connection manager from a camera.
If [Transmitter] items are changed, reconnect each camera after saving the settings.
Receiver
- User Name: Enter a user name for signing in to the connection manager from PWA-RXS that is receiving live streaming.
- Password: Enter the password for the user name above.
- Port: Sets the TCP port number used when connecting to the connection manager from PWA-RXS that is receiving live streaming.
If [Receiver] items are changed, run the Initialization Tool on the PC on which PWA-RXS is installed after saving the settings, then reconnect.
[Destination Server]
Configures a destination server for transferring clips uploaded from transmitters to an external server.
For details about configuring destination server settings, see “Configuring a Destination Server.”
[Transfer Preset]
Configures multiple destination servers and transfer settings as transfer presets.
For details about configuring a transfer preset, see “Configuring a Transfer Preset.”
[FTP]
Configures the FTP server of PWA-RXS that receives clips uploaded from transmitters.
- Server Name: Displays the FTP server name.
- Host Name / IP Address: Enter the IP address or host name for accessing PWA-RXS (internal FTP server) from the Internet.
- Port: Enter the control port of the FTP server for accessing PWA-RXS (internal FTP server) from the Internet.
- Start Port for FTP Passive Mode: Enter the passive mode data port of the FTP server for accessing PWA-RXS (internal FTP server) from the Internet.
[Live Streaming]
- Use Target Bitrate Setting: Specifies whether to enable manual setting of the target bit rate in the settings area of the Live Streaming screen. Placing a check mark in the checkbox enables you to select a [Target Bitrate] value, depending on the [Network Range] setting in the settings area.
- Enable HEVC (H.265) Codec: Place a check mark in the checkbox to use H.265/HEVC. H.265/HEVC transmission is not performed if H.265/HEVC is not supported by the transmitter device or if H.265/HEVC is not enabled on the transmitter device.
[License]
Displays a list of licenses. Can be used to check the status and valid period of licenses.
- [Get DEVICE.DAT] button: Obtain the “DEVICE.DAT” file required when creating an installation key file using Upgrade and License Management Suite.
- [Install] button: Installs the installation key file created using Upgrade and License Management Suite.
[Dashboard]
Displays the live streaming usage status.
- Live Streaming Time: Displays the cumulative live streaming time in graph view.
- Live Streaming Performance: Displays the live streaming history in graph view. You can click the graph area and zoom in/out using the mouse wheel. You can drag left/right to scroll the range of the graph.
[Maintenance]
- Connection Manager Version: Displays the software version of the connection manager.
- Connection Manager Settings: Click the [Backup] button to back up the configuration file. The backup file is output to the /opt/sony/c3p/backup folder. For details about backing up and restoring, refer to the “System Integration Guide.”
[Auto Delete Clip Settings]
Configures auto deletion of clips.
[Creators' App for Enterprise]
Displays a list of smartphones on which Creators' App for Enterprise is installed and is connected to PWA-RXS.
To manage smartphones on which Creators' App for Enterprise is installed
When a user with [File Transfer Manager] permission signs in to PWA-RXS from Creators' App for Enterprise, their smartphone and information from Creators' App for Enterprise are automatically added to the list. They cannot be added using PWA-RXS.
To delete a smartphone from the list, place a check mark beside the smartphone to delete and click the  (Delete delete) button.
-
[Delete uploaded clips automatically]
- [ON]: Automatically deletes clips on smartphones after the clips have been uploaded from Creators' App for Enterprise to PWA-RXS.
- [OFF]: Does not delete clips on smartphones after the clips have been uploaded from Creators' App for Enterprise to PWA-RXS.
- [Set behavior by app]: Follows the settings configured in Creators' App for Enterprise on each device.
Note
- This setting is applied to smartphones when signing in from Creators' App for Enterprise.
[LiveU Central]
To upload clips from a LiveU transmitter, you must connect to LiveU Central and retrieve information about the LiveU transmitter/receiver. Information for connecting to LiveU Central can be obtained from LiveU.
Enter the following information to connect to LiveU Central.
- API Endpoint
- API Key
- Application ID
- Authorization
Use the following buttons after entering the connection information.
- [Connection Test] button
Runs a test to determine whether you can connect to LiveU Central using the entered connection information. - [Save LiveU Central Settings] button
Saves the connection information.
[Transmitter] tab
Configures transmitter (cameras, SRT Caller) settings.
-
 (Add transmitter) button: Adds a transmitter. Click the button to add one line to the transmitter settings. Enter a name and select a group. When finished the configuration, click the [Save Transmitter Settings] button.
 - Transmitter Name: Enter the name of the transmitter for display in the connection manager.
- Group: Selects the group to which the transmitter belongs.
- Model Name: Displays the model name of the transmitter.
- Serial No.: Displays the serial number of the transmitter.
- Software Version: Displays the software version of the transmitter.
-
Registration Status: Displays/sets the license status of the transmitter. To allow connection of a transmitter, change the status to “registered.”
- pending: Registration pending status when the transmitter attempts to connect.
- registered: Transmitter is registered, but not connected.
- ready: Transmitter is registered and connected.
-
(Delete) button: Deletes the transmitter from the list.
- [Edit Group]: Edits groups.
[Receiver] tab
Configures PWA-RXS settings for receiving live streaming.
List
- Receiver name: Displays the name for display in the connection manager.
- Model Information: Displays the model name and serial number.
- Software Version: Displays the software version of the connection manager.
- SDI Information: Displays version information about the SDI input/output board installed in the PC.
-
(Delete) button: Deletes a PWA-RXS from the list.
Item
- Receiver Name: Enter the name for display in the connection manager.
- Host Name / IP Address: Enter the IP address or host name for accessing PWA-RXS from the Internet.
- Start Port for Live Streaming: Enter the number of the first UDP port used for receiving live streaming from the Internet.
- SRT Listener Ports : Displays the receive port number used when outputting to SDI if receiving using SRT. Selected from the range in [Start Port for Live Streaming].
SDI Settings
- Resolution: Selects the output video resolution.
- Frame Rate: Selects the output video frame rate.
- Reference Lock: Displays the external sync signal settings and lock status for locking to the SDI output. “Auto” is always displayed as the setting.
- Output Signal: [Black], [Color Bar], or [User Image] can be specified as the output image when live streaming is stopped. If [User Image] is specified, specify an image file for display as the output image (1920×1080 resolution JPEG or BMP image) using the Initialization Tool.
- SDI Port Name: The SDI port can be renamed. The number of ports displayed will vary depending on the SDI board installed in the PC.
SRT Listener Settings
Configures SRT receive settings. Match to the settings on the SRT caller side.
- Resolution: Displays the expected screen size of the input video. Displays the same resolution value as the SDI settings.
- Frame Rate: Displays the expected frame rate of the input video. Displays a value corresponding to the frame rate in the SDI settings.
- Codec: [Auto] is always displayed.
- Latency (20 - 8000 ms): Sets the latency in the range 20 to 8000 milliseconds. You can set the latency separately on both the SRT Caller side and SRT Listener side, but the larger of the two values will be used.
- Encryption Type: Enables/disables encryption and selects the encryption method. AES-128 corresponds to pbkeylen=16 and AES-256 corresponds to pbkeylen=32. When encryption is enabled, only live streams that are encrypted with the same method can be received.
- Passphrase: Enter the passphrase used for encryption.
Output Option
Selects options for output of the received live streaming.
- SDI Output Only: Output on SDI connector only.
- File Output: Enable file output.
- RTMP Output: Enable RTMP output.
Note
- PWAL-RXSSY (Network RX Station SDI Output License) is required for SDI output.
File output settings
-
Mode: Selects the method for saving video during live streaming to a file.
- Sync with Live Streaming: Starts saving to a file when live streaming starts.
- Sync with Rec Flag: Starts/stops saving to a file in sync with the REC/STOP flag sent from the camera.
-
Save Location: Displays the file save destination.
Note
- The file save destination is “/opt/sony/c3p/rx-server/out/” (fixed).
- Delete recorded clips automatically: Specifies whether to enable automatic deletion of saved files. To enable automatic deletion, set to the on-state and specify the number of days to keep files and the schedule for deletion.
RTMP output settings
- Stream URL: Enter the URL of the RTMP output destination (for example, rtmp://rtmp.example.com:1935/live). For RTMPS output, specify “rtmps://” in the URL (for example, rtmps://rtmps.example.com:443/live).
- Stream Name / Key: Enter the live stream name or key.
- Resolution: Selects the RTMP output resolution.
- RTMP Authentication: Place a check mark in the checkbox if authentication will be required.
- User Name: If [RTMP Authentication] is enabled, enter a user name.
- Password: If [RTMP Authentication] is enabled, enter a password.