Configuring the Network Settings of the Projector
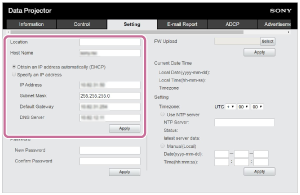
Configure the network functions from the [Setting] page.
Note
- The entered value will not be applied until [Apply] is clicked.
-
Click the [Setting] tab and display the [Setting] page.
-
Configure [Location].
-
Configure [Host Name].
This host name must be the same as the Common Name (common name) of the certificate used when accessing via https communication. For details, refer to “Configuring https Communication.”
-
Configure [Obtain an IP address automatically (DHCP)] or [Specify an IP address].
-
Click [Apply].
Settings
[Obtain an IP address automatically (DHCP)]
Network settings are automatically assigned via the router or other device’s DHCP server function. The values allocated by the DHCP server are displayed in [IP Address], [Subnet Mask], [Default Gateway], and [DNS Server].
[Specify an IP address]
Configure the network manually.
- [IP Address]: Enter the IP address of the projector.
- [Subnet Mask]: Enter the subnet mask of the projector.
- [Default Gateway]: Enter the default gateway of the projector.
- [DNS Server]: Enter the primary DNS server of the projector.