Configuring https Communication
Configure https communication on the [Certificate] page.
-
Click the [Certificate] tab and display the [Certificate] page.

-
Select [Communication Mode].
- [Http]: http connection only.
- [Http and Https]: https and http connection can be used at the same time.
- [Https]: https connection only.
Select [Https] for https connection. However, follow the steps in “Connecting with https for the First Time” to set up https connection for the first time.
The encryption protocol supported by the projector is TLS 1.2. In addition, the port number is set to 443.
-
Set a certificate.
-
[Upload Trusted CA Certificate]: The certificate issued by a CA will be installed. Select a certificate saved in a folder on your computer.
Click [Apply] to install it.Supported certificate
- Format: PEM
- Extension: CRT, PEM
- Encryption: RSA
- Hash: SHA-256/SHA-384
- Key length: 512/1024/2048/4096 bit
-
Common Name: Network host name
For Common Name, use the host name set under [Host Name] on the [Setting] page. - Organization: Define by customer
- [Generate self issued certificate (for test only)]: The certificate generated within the projector (self-generating certificate) will be installed. Click [Apply] to install it.
You can use either the certificate issued by a CA or the certificate generated within the projector (self-generating certificate).
-
[Upload Trusted CA Certificate]: The certificate issued by a CA will be installed. Select a certificate saved in a folder on your computer.
The installed certificate will be displayed in [Certificate information].
- [Status: OK]: When the certificate issued by a CA is installed and it is within the certification period.
- [Status: Expire]: When the certificate issued by a CA is installed but is past its expiration date.
- [Status: (blank)]: When a self-generating certificate is installed.
When Using the https Function
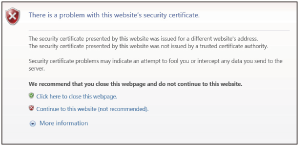
Use the host name set under [Host Name] on the [Setting] page to access the projector. Registration of the projector host name to the DNS server may be required depending on the operating environment. When accessing the projector with a different host name, such as the projector’s IP address, a warning window may be displayed. In this case, continue with the procedure by referring to the instructions on the screen.
Example of the Screen for Internet Explorer (When the OS is Set to English)
Note
- When using a self-generating certificate, proof of existence, which is one type of https communication, cannot be used for the following reasons.
- The secret key generated by the projector is self-signed.
- A value decided in advance is entered for the Distinguished Name (Common Name, etc.).
- A certificate has not been issued by a CA trusted by the user’s system.
For security purposes, we recommend using a self-generating certificate in the case complete security, such as operation tests, is not necessary.
- The last certificate becomes effective.
- When using a self-generating certificate, [Security Warning] may be displayed when using a browser and connecting with https. In this case, continue with the procedure by referring to the instructions on the screen.
- https connections may not be possible depending on the certificate installed in the projector. In this case, install a CA certificate to your computer. For details, refer to “Installing a CA Certificate to Your Computer.”
- Models sold in China do not include https functionality.
- If using the https function, be sure to adjust the projector date and time before configuration. If the date and time are not accurate, you may not be able to connect via a browser.