Parts and Controls (Remote Commander and Control Panel)
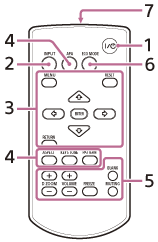
Remote Commander
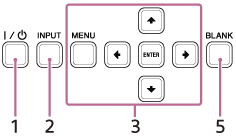
Control panel
-
 /
/
 (On/Standby) key
Turn on/Standby. -
INPUT (Input selection) key
Select the input. -
MENU (Menu) key
RESET (Reset) key
ENTER (Enter)/ /
/
 /
/
 /
/
 (Arrow) keys
RETURN (Return) key
Perform menu operations, etc. -
ASPECT (Aspect) key
Switch the aspect ratio of the projected image.
KEYSTONE (Trapezoidal correction) key/PATTERN (Pattern) key
Adjust the projected image.
APA (Auto Pixel Alignment) key
Adjust the input signal to fit to the screen automatically when there is a computer signal being input from the RGB input terminal (Input A). -
D ZOOM (Digital zoom) +/- key
Zoom in or out on a part of the projected image. This can be used when there is a computer signal being input. However, depending on the input signal resolution, it may not be usable.
BLANK (Eliminate image) key
Temporarily turn off the projected image. Press again to release.
MUTING (Mute) key
When sound is output, temporarily mute the audio. Press again to release.
VOLUME (Sound volume) +/- key
Adjust the sound volume.
FREEZE (Freeze) key
Temporarily freeze the image. Press again to release. This can be used when there is a computer signal being input. -
ECO MODE (Eco Mode) key
Allows you to set to Eco Mode. - Infrared transmitter
Remote Commander Operation
- Direct the Remote Commander toward the remote control receiver.
- The shorter the distance between the Remote Commander and the projector, the wider the angle within which the Remote Commander can control the projector.
- If there is any obstruction between the Remote Commander and the remote control receiver on the projector, the projector may not be able to receive signals from the Remote Commander.