Cleaning the Air Filter (For Installing to the Ceiling) (For the Customers in India only)
When the message that prompts cleaning the air filter appears, clean the air filter. If the dust cannot be removed from the air filter even after cleaning, replace the air filter with a new one. For details on a new air filter, consult with qualified Sony personnel.
Caution
If you continue to use the projector even after the message is displayed, dust may accumulate, clogging it. As a result, the temperature may rise inside the projector, leading to a possible malfunction or fire.
- Turn off the projector and disconnect the AC power cord from a wall outlet.
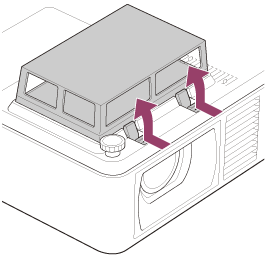
- Remove the dust cover assembly by pressing the two levers and lifting it up.
- Push all four sides of the dust cover to loosen the hook, and then remove the dust cover (A) from the filter frame (B).

- Remove the air filters (A) and (B) from the filter frame.

- Clean the air filters with a vacuum cleaner.
- Put the air filters and dust cover back into the dust cover assembly, and then attach the dust cover assembly to the unit.
Note
- If you remove the dust cover assembly while the power is turned on, you may accidentally touch the fan inside the projector, which may cause injury.
- Properly attach air filters (A) and (B) to the filter frame, making sure they do not overlap with the hooks on the filter frame.
- Securely attach the dust cover to the filter frame, then attach the dust cover assembly to the unit. Incorrect attachment of the dust cover assembly may cause a malfunction.
- Do not use the unit on the floor when the dust cover is removed from the dust cover assembly. Malfunction may occur.