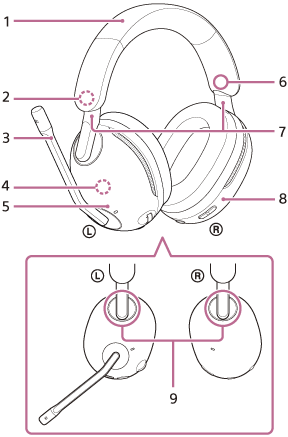
Location and function of parts
INZONE H9:
-
Headband
-
 (left) mark
 -
Boom microphone
There is a boom microphone on the left unit.
-
Built-in antenna
A Bluetooth antenna is built into the headset.
-
Left unit
-
 (right) mark
 -
Sliders (left, right)
Slide to adjust the length of the headband.
-
Right unit
-
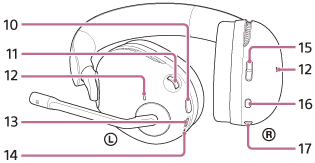
Ring indicators (left, right) (blue or white)
-
NC/AMB (noise canceling/Ambient Sound Mode) button
-
VOL (volume) –/+ dial
There is a tactile dot on the + side.
-
Noise canceling function microphones (left, right)
Pick up the sound of the noise when the noise canceling function is in use.
-
USB Type-C port
Connect the headset to a computer, or to an AC outlet via a commercially available USB AC adaptor, with the supplied USB Type-C cable to charge the headset.
-
Charging indicator (orange)
Lights up or flashes in orange to indicate the rechargeable battery and charging status.
-
GAME/CHAT (game/chat balance) button
You can adjust the volume balance between the game sound and voice chat.
-
 (Bluetooth) button
 -
 (power) button
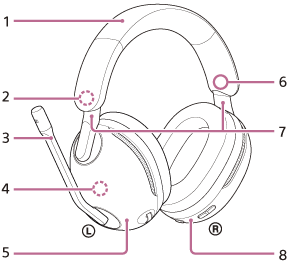
INZONE H7:

-
Headband
-
(left) mark
-
Boom microphone
There is a boom microphone on the left unit.
-
Built-in antenna
A Bluetooth antenna is built into the headset.
-
Left unit
-
(right) mark
-
Sliders (left, right)
Slide to adjust the length of the headband.
-
Right unit
-
VOL (volume) –/+ dial
There is a tactile dot on the + side.
-
USB Type-C port
Connect the headset to a computer, or to an AC outlet via a commercially available USB AC adaptor, with the supplied USB Type-C cable to charge the headset.
-
Charging indicator (orange)
Lights up or flashes in orange to indicate the rechargeable battery and charging status.
-
GAME/CHAT (game/chat balance) button
You can adjust the volume balance between the game sound and voice chat.
-
(Bluetooth) button
-
(Bluetooth) indicator (blue)
Lights up or flashes in blue to indicate the status of the Bluetooth connection.
-
(power) button
-
(power) indicator (white)
Lights up or flashes in white to indicate the power status and the connection status between the headset and the USB transceiver.
USB transceiver:

-
Slide switch
Switches the headset connection to a computer or PS5™.
-
Connect indicator (white)
-
Connect button