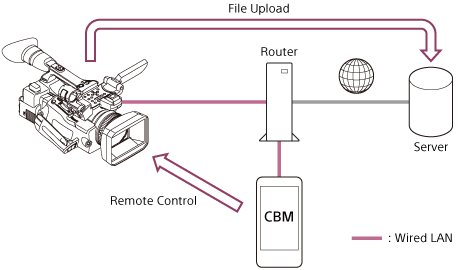
Connecting via Wired LAN
Connect the device that you want to connect to the mobile device via wired LAN.
You can control the camcorder remotely and upload the file as you do via Wi-Fi.
For Android devices
When the mobile device is compatible with a USB Ethernet adapter, it can be connected to the wired LAN using the USB Ethernet adapter.
The connection method varies depending on mobile devices. For details, refer to the instruction manual of the mobile device.
For iOS devices
The mobile device can be connected to the wired LAN using a Lightning to USB 3 camera adapter and USB Ethernet adapter.
Note
- When using a “Wired LAN”-supported device with the Camera Remote Control setting, set this setting to “Enable.”
- When using a compatible device without an access authentication setting, step 4 is not required.
Perform step 4 only when using a compatible device without a default access authentication setting or when the default access authentication setting has been changed.
- Tap
 (Menu) – [Connect].
 - Tap [Refresh].Compatible devices that can be connected appear.
- Tap a device to connect.
- Enter a [user name] and [password] which are set on the compatible device.When the fingerprint is displayed in the authentication dialog box, make sure it matches the fingerprint of the device you want to connect to.
If authentication is successful, the connection is established and the menu screen appears.
Scanning the QR code to connect
When [Scan QR code] is displayed in the authentication dialog box, you can connect using the QR code.
In step 4, tap [Scan QR code] in the authentication dialog box.
Display the QR code on the screen of the device you want to connect to, scan the QR code on your mobile device, and the user name and password will be entered automatically.
For devices that require fingerprint matching, it is also done automatically.
Note
- If both Wi-Fi connection and wired LAN connection are enabled, the mobile device searches devices that are connected via wired LAN.
- Tap the
 icon in the authentication dialog box displays the input password as plain text. Be aware that this may allow your password to be intercepted by a third party.
 - On the next connection, step 4 is not required because the successfully authenticated user name and password are saved to this application.
If you want to delete the saved user name and password, see “Deleting the Registered User Name and Password.” - For details on displaying the QR code and fingerprint on the connected device, refer to the instruction manual of the connected device.
Hint
- Targeted network interfaces (Wi-Fi, Tethering, Wired LAN, No active I/F) are displayed on the top of the screen.