Parts and controls
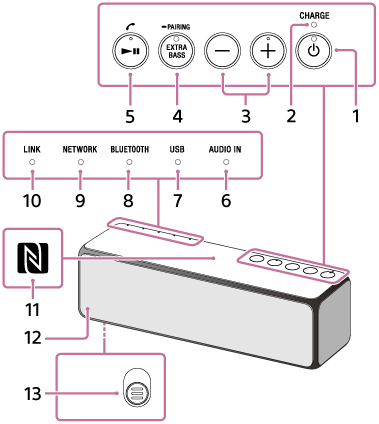
Top and bottom
Rear
-
 (power) button with indicator
Press and hold for 8 seconds to reset the speaker.
- CHARGE indicator
-
–/+ (volume) buttons
The
(power) indicator flashes 3 times when reaching maximum or minimum volume.
The + (volume) button has a tactile dot. Use the tactile dot as reference when operating the speaker. -
EXTRA BASS button with indicator/
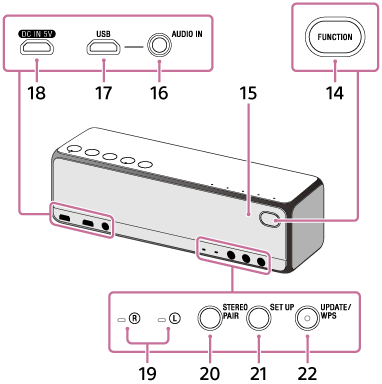
 PAIRING button
- Press to set sound effects. It is set off by default at time of purchase.
- While the speaker is turned on, press and hold for more than 3 seconds to switch to BLUETOOTH pairing mode.
-
 (play) button/
 (call) button
- Operate to play/pause/skip/go back.
- Press to receive a call.
It has a tactile dot. Use the tactile dot as a reference when operating the speaker.
- AUDIO IN indicator
- USB indicator
- BLUETOOTH indicator
- NETWORK indicator
- LINK indicator
-
N-Mark
Touch this mark with an NFC (FeliCa) compatible device.
- Speaker grille
- (Bottom) Grille detachment lever
Removes the front speaker grille.
- FUNCTION button
Press to change the speaker modes in the following order:

- Microphone
Built in for a hands-free call.
-
AUDIO IN jack
Connect to the headphone jack of a portable audio devices, etc., using a commercially-available audio cable (with stereo mini plugs/no resistance).
-
USB port
Connect to a PC or High-Resolution Audio compatible WALKMAN ® or Xperia.
- DC IN 5V jack
-
 (right)/
 (left) indicator
Lights up when Speaker Add function, Wireless Surround function*1 or Wireless Stereo function*1 is used.
-
STEREO PAIR button
Press to use Speaker Add function or Wireless Stereo function*1 with two speakers.
-
SET UP button
Press to use Stereo Mode function with two speakers or to use Wireless Surround function*1 by combining the speaker with other audio devices.
- UPDATE button with indicator/WPS button
- Indicates the status of the speaker's software update. After pressing and holding for 2 seconds when the indicator is lit, the speaker beeps and the software update starts.
- If your wireless router has a Wi-Fi Protected Setup™ (WPS) button, you can use this button to connect to the network*2.
If your wireless router has an AOSS button, it can be used as a Wi-Fi Protected Setup™ (WPS) button. For details, refer to the operating instructions supplied with your wireless router.
*1For more details, refer to the following URL.
http://sony.net/nasite
*2Not available while the UPDATE indicator is lit