Adjusting the Position of the Projected Image (VPL-XW7000/VPL-XW6000)
Hint
- The
 /
/
 (Power), INPUT, MENU, and
  /
/ /
/ /
/ (Up/Down/Left/Right)/
 (Enter) buttons on the control panel of the main unit function in the same way as those on the remote control. The LENS button functions in the same way as the FOCUS, ZOOM, and SHIFT buttons on the remote control.
 - When adjusting the lens on the control panel, each time you press the LENS button on the main unit, the lens adjustment function switches in the order of FOCUS, ZOOM, and SHIFT.

- When [Lens Control] is set to [Off] in the
 [Installation] menu, you cannot make adjustments with the FOCUS, ZOOM, or SHIFT button.
 - When [Test Pattern] is set to [Off] in the
 [Function] menu, the test pattern is not displayed.
 - Focus adjustment
The projection lens of the high brightness projector is thermally affected by the light from the light source. Therefore, the focus is not stable immediately after turning on the power. To adjust the focus more precisely, it is recommended to adjust the focus after 30 minutes or more have elapsed since the projector has been turned on, and after the lens focus adjustment window (test pattern) has been displayed for 2 minutes or more.
Note
- Depending on the installation location of the projector, you may not be able to control it with the remote control. In that case, use the remote control by pointing it towards the remote control detector on the projector or towards the screen.
- Adjust the lens with the control panel on the main unit or with the remote control. Do not adjust the lens by turning the lens directly with your hands. Doing so may cause damage or malfunction.
- Do not touch the lens when you adjust the image position. Your fingers may be pinched when the lens extends/retracts.
- Note that if the unit is tilted up or down, the projected image will be distorted in a trapezoidal shape.
- Be careful not to pinch your fingers when rotating the front feet (adjustable).
-
Press the FOCUS button to display the lens focus adjustment window (test pattern). Then, adjust the focus of the image with the/// (Up/Down/Left/Right) button.
To turn off the test pattern, press the
(Enter) button. -
Press the ZOOM button to display the lens zoom adjustment window (test pattern). Then, adjust the size of the image with the/// (Up/Down/Left/Right) button.
To enlarge the image, press the
/ (Up/Right) button.To reduce the image, press the
/ (Down/Left) button. -
Press the SHIFT button to display the lens shift adjustment window (test pattern). Then, adjust the position of the image with the/// (Up/Down/Left/Right) button.
To adjust the horizontal position
Press the
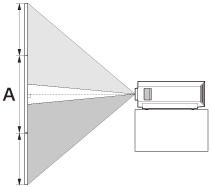
/ (Left/Right) button to move the projected image horizontally from the center of the lens.Top view

A: One screen width
 : Image position when moving the image fully to the left
 : Image position when moving the image fully to the right
To adjust the vertical position
Press the
/ (Up/Down) button to move the projected image vertically from the center of the lens.Side view
A: One screen height
 : Image position when moving the image fully upward
 : Image position when moving the image fully downward
To return the lens position
Press the RESET button on the remote control while the lens shift adjustment window is displayed. The lens returns to the center (factory default position). (The zoom and focus settings are not changed.)
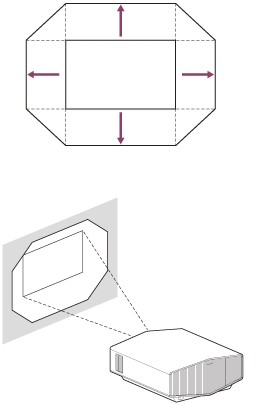
Range of movement on the projected image
You can move the projected image only within the octagon area shown in the figure below. The movable range depends on the lens or the aspect ratio of the projected image.
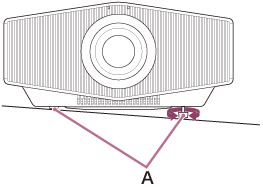
To adjust the tilt of the installation surface
If the unit is installed on an uneven surface, use the front feet (adjustable) (A) to keep the unit level.
Lens adjustment window (test pattern)
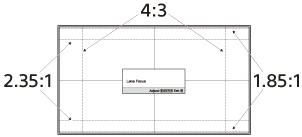
The dashed lines show the angle of view of each aspect ratio.